How to make solid soap from a soap base. What is a soap base? Soap base soap recipes. Types of soaps you can brew
The passion for soap making has overwhelmed the needlewomen! A hobby does not require special skills, and success depends only on the presence of imagination and knowledge of small secrets. Passion has a lasting practical basis - soap is always useful in the household, and will not lie dead weight on the shelves, like many even the most beautiful crafts. In addition, a piece of self-made soap will be an excellent gift for any occasion - themed presentation of the presentation will emphasize its uniqueness.
Materials and accessories
Making soap at home requires a minimum set of not only accessories, but also materials. You will need:
- Soap base.
- Base oils.
- Fragrances and essential oils.
- Dyes.
- Decorative decorations and useful additives.
- Alcohol in a spray bottle.
- Forms for filling.
- Plastic cups, plastic spoons, wooden sticks, rubber gloves.
Let's take a closer look at each of these components. 
The basis
Available in the form of bars or shavings. The base contains alkali, water, vegetable oils... It can be transparent or matte. In handicraft stores, where you can buy a soap base, there is also a special composition for making soap with swirls - beautiful swirls. This base has a more viscous consistency, which allows the layers of the mixture not to mix with each other, but to intertwine with each other in an original way or even be within clearly defined boundaries. 
Instead of buying a special soap base, you can use baby soap. This will be the most simple option to make a new piece of detergent. However, such a product will always be matte. Novice soap makers need to take into account that the special base lathers better, has no odor, does not cause irritation, and also hardens and dries faster than baby soap.
Base oils
Added to soaps to make them moisturizing, nourishing and softening. Such oils do not have a strong odor and are highly fatty. It can be argan, sea buckthorn, olive, almond, coconut, peach, sunflower oil and even squeeze from wheat germ. Usually the base is added in the amount of 1-2 teaspoons per 100 g of the base. 
Essential oils
They give the products the desired aroma and special properties. Scented additives can be used to prevent and treat skin diseases, for example, shea and tea or rosewood butter, fir oil to achieve a soothing effect, and orange oil to fortify the skin. The many available essential supplements allow you to create unique compositions not only in terms of smell, but also a healing effect.
Important! Essential oils are added at 1-2 drops per 100 g of soap base - their excess causes allergies and even burns.

Dyes
Not only safe commercial mineral-based formulations are used, but also any home remedies - fruit or vegetable juice, food coloring, herbal decoctions. Sometimes the base oil already gives color, for example, fir oil colors the piece in pleasant green shades. Plain cinnamon has a faint aroma and rich brown color. A substance called titanium dioxide, which is completely harmless to health, makes the soap matte. Special pearlescent dyes give a charming shimmer. 
Decorative ornaments, useful additives
Decorations include all kinds of glitter, dried fruits, petals, plant pieces, coffee beans, seeds. Useful additives - milk, cream, coffee grounds, honey, chocolate, ground cereals, loofah - give a moisturizing, nourishing, scrubbing, massage effect. 
Molds, alcohol and accessories
Particular attention is paid to the selection of molds for pouring soap. They allow you to give the pieces an interesting shape. Flowers, animal silhouettes, geometric shapes - everything fits. Of the materials, preference should be given to silicone, rubber, plastic, because finished products glass or ceramic is quite difficult. You can use not only special forms, but also any you like, for example, for baking or even children's molds for sculpting Easter cakes.
Attention! Do not use metal molds for pouring liquid soap mass due to unforeseen chemical reactions - products may change color or become hazardous to health.
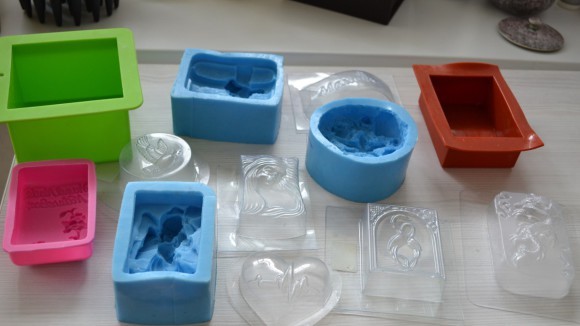 Medical alcohol, poured into a spray bottle, will help get rid of the formation of small bubbles on the finished soap. The liquid must be sprayed onto the mold before pouring and the surface of the piece, which remains outside. If a multi-layer product is being made, then each layer must be sprayed.
Accessories include plastic cups for diluting the base, wooden sticks for stirring it, plastic measuring spoons for the base oil, pipettes for essential oils, toothpicks for scratching out adjacent surfaces when making multi-layer products. It is advisable to work in thin gloves, and if soap shavings are used, it is better to wear a respirator. 
A quick way to brew soap for beginners
There are many homemade soap recipes that are suitable for beginners. In this case, all instructions come down to a few simple steps:

Important! If the soap base is melted in the microwave, then you cannot let it boil - this will ruin its properties.
At first, you can use ready-made recommendations for creating compositions to learn how to handle the basics and select combinations of essential oils and additives. Even a little experience in the future will allow you to come up with your own unique products not only in design, but also in content. The main thing is to use only safe ingredients. 
Advanced soap makers make their products from scratch, that is, they use solid oils and an alkali solution. After manufacturing, such products must be aged for 2 months. This is a very long way to make soap, which only experienced craftsmen can do.
So, soap making at home for beginners, simple recipes ...
Now we will consider in practice how to make the soap of your dreams - useful, beautiful and unique. We will move from simple to complex, and photos of finished products will help find inspiration and catch the courage... In all recipes, the ingredients are indicated in teaspoons. 
Attention! In every case, remember to use rubbing alcohol to eliminate air bubbles.
1. Honey aroma
For 100 g of melted transparent base, take a spoonful of argan oil and honey. The components are combined and mixed thoroughly. If you add a pinch of pearlescent dye, then the finished piece will acquire an extraordinary overflow.
Useful properties: nourishment and softening of the skin. 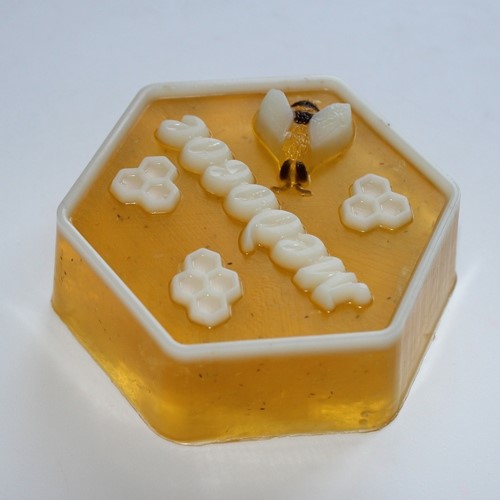
2. Honey-olive tenderness
The idea is inspired by Mediterranean motives. For preparation, you will need 300 g of any melted base, 3 tablespoons of honey and olive oil, 3 drops of green dye, a spoonful of dried ground basil. All components are added to the base one by one and mixed thoroughly. The mass is poured into a mold designed for 3 pieces.
Useful properties: nutrition, softening, scrubbing. 
3. Delicate cleansing
It is necessary to prepare 100 g of a melted base, transparent or matte, into which a spoonful of finely ground sea salt, 2 tablespoons of white clay, 4 drops of rosewood oil are alternately introduced. The mixture is kneaded, poured into a mold.
You can use ground coffee or coffee grounds as a scrub.
Useful properties: cleansing, scrubbing, soothing effect. 
4. For irritated skin
A matte base is used - 100 g, 2 tablespoons of pink clay, a spoonful of apricot oil, vanilla flavor - 5 drops.
Useful properties: gentle cleansing, removing irritation. 
5. For problem skin
If your skin is worn out by acne, then you can try a simple recipe with a healing effect. The base is taken transparent - 100 g, half a spoonful of it is added grape seed oil and olive oil, as well as a spoonful of finely chopped seaweed. If desired, you can color with a blue dye, and the smell with sea flavor, taken 2 drops.
Useful properties: cleansing, nutrition, disinfection, treatment. 
6. Strawberry bliss
It is made from 100 g of an opaque base, 5 tablespoons of heavy cream and half a spoonful of olive oil and an oil made from strawberry seeds. Added strawberry and creamy flavors, pink dye.
Useful properties: nutrition, hydration. 
Attention! If you can only buy a clear soap base, go for titanium dioxide, which adds a matte finish.
7. Coffee and yoghurt pie
This option for making soap is no longer as simple as the previous ones. It involves the creation of a multi-layer structure. The main rule is that each layer must dry well! To “bake” a soap cake you will need - a transparent base 100 g, 3 tablespoons of ground cinnamon - it will give a dark color and light aroma, titanium dioxide - liquid or dry, cappuccino flavor, purple dye, alcohol. 
The manufacturing sequence is as follows:
- Melt the base, take a fourth of it, mix with cinnamon until dark, pour into a mold, sprinkle with alcohol.
- While the first layer is drying, make a second layer - add titanium dioxide, cappuccino flavor, a drop of purple dye to the base to add shade.
- Scratch the hardened first layer with a toothpick so that the second tier sticks to it tightly. Pour in the second layer, sprinkle with alcohol.
- The third tier is done by analogy with the first, and the fourth - by analogy with the second.
The thickness of each tier is selected arbitrarily.
Useful properties: invigorating effect of coffee. 
8. Coniferous tornado
Not the easiest recipe for making soap, because it uses the technique with swirls - beautiful swirls. For such a product, a special base is taken - in stores it is called the "Basis for making soap with swirls". It differs from a conventional base in a thicker consistency, which prevents the interpenetration of liquid layers. Products are made from a pound of base, since it is difficult to get swirls from ingredients taken in small quantities. Then the piece is cut into small pieces. 
Let's take a closer look at the manufacturing process:
- a pound of melted base is poured into two cups equally;
- in one of the cups, 3 drops of green pigment are preliminarily diluted with 5 ml of water, since it will be difficult to mix the dye with the melted base;
- in another glass, a matte mass is made with the help of titanium dioxide;
- a spoonful of fir oil is added to each glass, everything is thoroughly mixed, and the bubbles are removed with alcohol.
The main thing in getting beautiful swirls is the pouring technique. 
Take a square silicone mold and pour a puddle of dark green mass into its center. Do not try to pour so much that the liquid immediately spreads over the entire bottom area. Then pour a little matte mass into the center of the green spot, then green again into its center, then matte again and pour both cups in this way until the base is over in them. Spray the surface with alcohol. After the soap dries, cut it into pieces - the amazingly beautiful swirls will not leave anyone indifferent.
Useful properties: sedative effect.
9. Massage soap with citrus scent
The massage effect is achieved using loofah - a dried Asian plant with a porous structure. The well-known washcloths are made from loofah. You can buy it at a craft store. 
Here's what you need to make this unusual soap:
- take a piece of loofah and soak it in a round cup for 15 minutes so that it takes the same shape;
- after softening, remove the loofah, wring it out, dry thoroughly with a paper towel - excess water can spoil the properties of the soap;
- melt 170 g of transparent base, pour it into two glasses;
- add 6 drops of grape seed base oil, 7 drops of yellow dye, 3 drops of Orange flavor to the first glass;
- add flavor and base oil in the same amount to the second glass, and take 6 drops of red and 2 drops of yellow dye - as a result, you get a mass reddish orange colors;
- wait until the mass in each glass thickens a little, and a light film appears on its surface;
- put the loofah in the mold and start pouring the soap compositions from two glasses at the same time, but in different corners;
- use a wooden stick to smooth the border between the flowers, remove the bubbles with alcohol.
 Useful properties: massage, scrubbing effect, invigorating effect.
Making soap at home is not only an exciting hobby, but also a very rewarding activity.
A simple technique for making soap from a ready-made soap base will help to cheer up, improve the condition of the skin, and make an unusual gift to relatives and friends. 
19.12.2016
For those who decide to make soap in their kitchen, I want to advise you to start mastering the basics by creating soap from a ready-made soap base. This option soap making for beginners will not discourage your desire to be creative, will give the result immediately. The fact is that novice soap makers often confuse making soap from a base and making soap from scratch. If you want to know how to make soap at home, then first "separate" these two concepts in your head.
"From scratch" means that you will have to remember some of the basics of chemical processes. You will work with alkali and fatty oils, the soap making process in this case is long. And it's better to go to it after you get comfortable with soap making from the soap base of industrial production.
That was the introduction, now my Photo master class. To watch the video of the master class, go to the very end of the article.
In order to make your own soap you will need:
- soap base, transparent, about 100 g;
- liquid dyes;
- flavors or fragrances;
- cosmetic oil (apricot kernel, grape seed and others);
- glass for melting the base;
- a glass in which you will mix all the ingredients;
- microwave or water bath;
- stirring spoons or sticks;
- soap molds.
Step by step instructions with photos
Melting the base
Cut the soap base into small cubes. This can be easily done with a regular knife.

Melt in a water bath, stirring constantly to prevent the base from sticking together. Even if this happened, do not be afraid - just here, in the container in which you melt the base, cut the stuck layer with a sharp knife and continue melting.
Many soap makers use a microwave, I also like to speed up the process. And cleaner in the kitchen. You can put a porcelain or glass cup with a base in the microwave, even a simple plastic cup will do if you have already adapted to the temperature regime and can adjust the power.

Set the "Defrost" mode, the weakest to begin with. Place the glass with the base in the microwave and turn it on for half a minute. Check how the base melts, if you did not see any changes, the cubes did not even melt, you can do it in two ways. Either increase the power a little, or increase the time to 1-2 minutes.
Choose one or the other depending on the brand of your device. It just seems incomprehensible and scary at first, then it will be easy - you already know your microwave inside and out!
So, the base melted and turned out in a glass of jelly. Be sure to stir well so that not even a small piece of unfused base remains.

Adding oils, fragrances and dyes
Pour into a glass to mix in. It is convenient to use disposable plastic cups. Naturally, I use them more than once, they are easy to wash after the process.
Place a few drops of base oil in the liquid base and stir.
Add the dye drop by drop, stirring constantly. Depending on the concentration of the dye, one to several drops will be required.
Sometimes I dilute a very "dense" dye slightly with water.

And lastly, add perfume. I pour about half a teaspoon per 100 g so that the aroma is felt well.
Soap formation
Pour the liquid soap into the prepared dish. Silicone does not need to be lubricated with oil or alcohol. If you work with plastic and are afraid that later it will be difficult to remove from the mold, then wipe the mold with oil.

Leave the drenched soap to harden. As soon as it hardens, and this happens within half an hour or an hour, the soap can be used.

If you let it rest for a few days, it will be much more pleasant, this is noticed by many soap makers. Wrap the soap in plastic wrap.
- Read the article before going to the store
- The soap base is commercially available from different manufacturers and in different qualities. Someone likes more "fat", someone like that, which quickly freezes. Only after trying, you can find your own basis for yourself. To understand better, read the article about the soap base from Russian manufacturers.
- Do not add more than one third of a teaspoon of oil to 100 g of soap base. Otherwise, your soap will not wash, there will be no foam, alas.
- Food colors are usually sold very concentrated. Therefore, they sometimes need to be diluted with water. And don't make the color very saturated, the soap should stay clear, like jelly. And colored foam is no use to you.
- Start working with silicone molds, there are no problems with them, they do not break, do not melt at high base temperatures.
- Buy goods for soap making for beginners can in or search in nearby geographically.
Successful soap making!
Your Helga.
Find more recipes for soap making in.
You may also be interested in these articles:
How to make picture soap
Soap making: How to make beautiful soap for men using mother of pearl

Soap making with my own hands has long been a useful and enjoyable hobby. Firstly, your product will not contain unnecessary chemical components and reflect badly on the skin; secondly, there will always be a beautiful and unique handmade gift at hand; thirdly, if things go well, all friends, acquaintances and friends of friends will reach out to you with orders. The only thing left is to learn how to make soap with your own hands at home.

How is hand soap different from factory soap?
Ordinary soap has an alkaline fatty base, which is supplemented with dyes, fragrances and other synthetic substances. Too much chemistry on our hands results in flaking, dehydration, and premature aging. Manufacturers often replace natural fats with artificial ones.
The base of homemade soap is also based on fat and alkali, but natural, and 100% natural ingredients act as additives: beeswax, coffee, herbal decoctions, aloe juice, oatmeal, honey, essential oils, vegetable and fruit juices. In general, everything that the imagination of your mini-soap factory is enough for. As a result, you will get not only a fragrant useful product, but also a remedy for rashes, redness and irritation on the skin. Agree, there are plenty of arguments to start making soap.
 The basis for making soap
 Now it remains to find out what you need to get started:
- Base. You can use a store-bought clear / matte soap base or regular baby soap with no additives or strong scent.
- Glycerol. The emollient and moisturizing properties of the substance have been known for a long time. In the pharmacy, the drug costs mere pennies.
- Oil. You can be original and use avocado, almond or apricot oil, or you can limit yourself to traditional sunflower oil.
- Ether. ABOUT useful properties essential oils we have told dozens of times. The essential oil for making soap is both a favorite aroma and a therapeutic effect at the same time.
- Plain water or milk to dilute the base.
- Dyes and additives - indicative list we have already given above.
- Soap molds - you can buy special ones, make your own, or use ordinary ones for baking cupcakes.
- You will also need a saucepan, glass bowl, and grater.
Let's get started!
 Practice making simple soap from remnants
 DIY soap from remnants at home
And the simplest thing that a beginner can do is soap made from remnants that endlessly collect on the shelf in the bathroom. It is worth practicing on them and conducting the first experiments at home soap making.
We rub all the remnants on a coarse grater, put them in a metal dish and add a little water. We put on a water bath and wait until everything melts, from time to time removing the foam from the surface. To avoid the formation of bubbles, do not mix the composition and turn it off before the mass boils.
We prepare the forms in advance and coat with any oil, pour over and leave to dry in a warm room. After a few hours, the workpieces are completely dry. We take them out and dry them for another two or three days.
 Multicolored leftover soap
 Thus, you will get the most commonplace soap with your own hands, but there are more intricate recipes. For example, you can make fancy soap from the remnants.
For this we need pieces of different colors. We cut them into pieces different sizes... First, pour the transparent base melted in a separate container into the molds. Mix the multi-colored pieces and moisten abundantly with alcohol so that they stick together. We put the stuck together multi-colored layer into the container with the base and wait for it to dry. We cut the finished product into arbitrary pieces. Or we immediately use various forms for solidification.
DIY liquid soap
It can also be prepared from leftovers baby soap or use whatever is at hand. The recipe is extremely simple. In addition to the rubbed remnants, you will need a dispenser bottle, lemon juice, and glycerin.
Pour some juice and a cap of glycerin into the container, then add the grated soap and fill it with hot water. Mix everything thoroughly, move it into a bottle with a dispenser and let it stand for two or three days. Shake well before use.
 It costs nothing to make liquid soap yourself
 Tip: You can also add a variety of essential oils, dyes, and dry herbs to your homemade liquid soap. And don't forget about glycerin: 1 tablespoon per 100 g of base.
DIY soap from a soap base
For a 100 gram piece you will need:
- 100 g base
- 1 teaspoon glycerin
- 3 teaspoons of base oil
- 3 drops of essential oil
- Milk or water
- 2 drops of dye
- Filler of your choice
 The basic recipe for soap making is extremely simple
 Cut the soap base into pieces. We mix glycerin with base oil and send it to warm up in a water bath. When it gets hot, add a little soap base, stirring constantly. While it is melting, pour in a little water or milk (the latter will make the finished product less brittle). When the mass becomes similar in consistency to sour cream, dyes and essential oil can be added to it.
We pour the finished product into molds. If bubbles appear, it is recommended to sprinkle them a little with alcohol. We send the blanks to freeze in the refrigerator. Then we take it out of the molds and let it dry for another couple of days.
 It is also good to add herbal extracts and herbs themselves to home cosmetics.
 DIY soap at home - 10+ recipes for beginners
Lavender
- We take 80 grams of the base and divide it into two parts. This is enough to make a 100 gram piece.
- Cut the base into small pieces and send to melt in a water bath, stirring constantly.
- We divide it into two parts. Add a little milk powder to one and mix thoroughly.
- We continue to cook in different pans. Pour 15 ml of almond oil and 3 drops of lavender essential oil into each.
- We dilute the transparent mixture with violet dye. Leave the mixture with milk unchanged.
- Put a branch of a dry plant on the bottom of the mold, fill it with a part of the transparent base. When it dries up a little, pour in a little white part. Alternate layers until the mass ends.
- Before making a new layer, each already finished part needs to be slightly scratched with a toothpick and sprinkled with alcohol to improve adhesion.
- Leave the mixture to harden, then remove it from the molds.
- Our fragrant gift soap is ready.
 Lavender soap
 Coffee scrub soap
Such a soap with your own hands will turn out not only beautiful, but also functional - it will help cleanse the skin and exfoliate keratinized particles. As an additional ingredient, you can add 2 tbsp. l. sea \u200b\u200bsalt. The recipe is pretty simple.
You will need:
- One baby soap or 80 g base
- 2 tbsp. l. coffee grounds
- 50 ml milk
- 1 tbsp. l. ground cinnamon
- 5 drops of grape seed oil
 Coffee scrub
 Rub the soap on a grater. We prepare a water bath and melt our workpiece on it. Pour in hot milk - it will soften the final product.
On average, the melting process will take about half an hour. Remember to stir constantly. Finally, we introduce the rest of the components.
Pour the resulting workpiece into a mold and send it to freeze in the refrigerator. These ingredients are enough for two impressive pieces that you can use every day while taking a shower.
Honey-creamy
Life Reactor has already talked about the benefits of honey many times, including for the skin - it is an antioxidant, a source of nutrition, and a means of fighting cellulite.
 The benefits of honey for the skin can be legendary
 So, we take:
- 100 g base or baby soap
- 0.5 tsp vanilla
- 1 tsp wheat germ oils
- 5 drops of vitamin A
- 2-3 st. l. cream
The cooking process itself is no different from the recipes described above.
Honey oat scrub
You can also make a scrub with honey, and use oatmeal as a base. To make the scrubbing particles smaller, pass them through a meat grinder or blender.
 Honey oat scrub
 You will need:
- 100 g base
- 1 tsp honey
- 1 tbsp. l. oatmeal
- 0.5 tbsp. l. olive oil
Tip: A moisturizing soap for dry skin can be made by adding aloe juice and glycerin to a traditional base.
Herbal soap
You will need:
- 100 g of soap base and baby soap
- 1 tsp chamomile
- 1 tsp hypericum
- 1 tsp horsetail
- 1 tsp essential oil of choice
- 0.5 tbsp. l. glycerin
- 1 tbsp. l. olive oil
 Healing herbal soap
 By its composition, you have already understood that such a soap will be healing - nourish, dry and soothe the skin. And if you feel like scrubbing, add a spoonful of chopped herbs at the end.
At the first stage, we prepare a decoction of medicinal plants. Pour 200 ml of boiling water over the herbs and let it brew.
Then melt the soap base and mix with all the ingredients, including the decoction. Pour into molds and let harden.
Diy tar soap
Everyone knows that this type of soap has proven itself in the fight against skin diseases: psoriasis, dandruff, deprive. Of course, it is easier to just buy a product at a pharmacy or store, but by welding it at home, you will surely be sure of the quality.
 Homemade tar soap
 You will need:
- 10 ml of tar
- 5 drops of essential oil of your choice
- 0.5 m. L. honey
The cooking recipe does not differ from the traditional one. Leave the finished soap to harden for three days.
Tip: You can use harmless food coloring to paint over a transparent base. Dry ones have a very concentrated base, so they must first be diluted in a small amount of water.
Peach Rose Petal Soap
Useful in case you can't choose a gift for your girlfriend. Surely she will appreciate the creativity.
 With rose petals
 You will need:
- 100 g base
- 5 drops of peach ether (can be substituted for the scent of your liking)
- 5 drops of rose essential oil
- Yellow or pink dye
- The actual rose petals
We cook the soap according to the traditional recipe. Add dye and other components to the melted base. Pour a thin layer into the mold, put the rose petals, fill in the second layer of the mass. We repeat the procedure until the workpiece is finished and leave to cool.
Cucumber antiseptic
So homemade cosmetic product will help you forget about peeling and dry skin for a long time, and for aroma you can add a little dry ground basil.
 Cucumber antiseptic
 You will need:
- 100 g baby soap or base
- Juice of 1-2 cucumbers
- 1 tbsp. l. olive oil
- 1 tbsp. l. dry ground basil
- 3 drops of any essential oil
And you already know the recipe.
Lemon
It will be the ideal face wash for those with oily skin prone to breakouts. The soap will dry, remove excess fat and tone. You won't even need flavorings - lemon itself is enough.
 Lemon soap
 You will need:
- 100 g base
- 1 tbsp. l. lemon zest
- One-third teaspoon of grape seed oil
- 5 drops of lemon essential oil, optional
- 0.5 tsp honey
- Yellow food coloring
Green tea soap
It will be great to refresh and tone in the summer. Let us also recall the antioxidant properties of green tea. Alas, the tea leaves will not give a rich emerald color, so you cannot do without a couple of drops of food coloring. You can also add a few tea leaves to the melted base for beauty.
 With green tea
 You will need:
- 100 g base
- 1 tbsp. l. strongly brewed green tea
- Dry tea leaves for decoration
- 7 drops of avocado oil
- 2 drops of peppermint essential oil
- 2-3 drops of green food coloring
Advice: if you don't have any food colors or essential oils at hand, you can always replace them with others or find a more suitable recipe, because soap making is creativity!

It just so happened that on the pages of my blog before today I only talked about soap making from scratch. But, as a rule, most soapmakers start with soap from the base, and given that the site is intended to help novice soapmakers, I will try to fill this gap.
We will not breed disputes about which zero or base is better, which is more natural, etc. In my opinion, everything is obvious here.
We will consider making homemade soap from the base as the first step in soap making. In addition, preparing soap from a base also has its advantages over zero soap.
Benefits of making homemade soap from a soap base:
- Fast and easy to prepare
- No need to have special tools and utensils for making soap
- Safety of the whole process. There is no need to use alkali, so it is easy to involve children in the process. They usually like it a lot!
- Simple and understandable composition of the future soap. You don't have to make complex recipes
- Homemade soap from a soap base turns out to be bright, beautiful, does not get wet in a soap dish, can be easily and for a long time stored
- Huge variety of base soap molds


To make homemade soap from a soap base, you will need:
- soap base
- base oil
- dye
- flavoring
- mold for soap
And a little about all this:
Today, manufacturers offer a fairly wide selection of soap bases.
There is an organic soap base that has a slightly yellowish tint. If the color is not important to you, then take it.
If you want to make beautiful snow-white or delicate shades of soap, it is better to use a white soap base. Then the soap will look like this:


From a transparent soap base, respectively, transparent soaps are obtained, if they are not stained, then you can make soap with any picture inside.
A transparent base can be made white by adding titanium dioxide dissolved in glycerin. In this regard, it is more versatile.


A beautiful soap is obtained by combining a white and transparent base.


Also in the store you can find a soap base with shea butter, goat milk, for swirls, soft, etc. Each type of base serves for specific purposes, either in the composition of the soap or in its design.
2. Base oil.
It can be any oil or oil mixture that will soften and improve the properties of the soap. Traditionally, no more than 1/3 teaspoon per 100g is added. soap base.
3. Dye.
For soap from the base, use ordinary food dyes (if the soap is planned to be of one color) or special cosmetic pigments for making soap of several colors. And when buying, pay attention to whether the pigment is migrating or not. Migrating - means that after some time the color of adjacent layers of soap will mix, forming a kind of gradient. And non-migratory dyes ensure crisp color boundaries in the finished soap.
Add to homemade soap 1-3 drops of dye per 100g.
4. Fragrance.
The base soap can be an essential oil, food or cosmetic fragrance. 5-7 drops are added per 100g.
5. Molds for soap
Any form for soap from the base can be used. Shapes for cutting and curly molds are also suitable.
It is more convenient to remove soap from silicone molds, but it is easy to get soap from plastic molds after half an hour or an hour spent in the refrigerator.
Making homemade soap from a soap base
Let's see how to make homemade soap from the base using the example of one of the simplest options - a one-color fill in a simple but very nice silicone mold. We will make soap from a white base.
1 . We will prepare everything you need to make soap: a scale, a heat-resistant glass, a glass rod, a mold, a base oil - I have a mixture of olive and almonds with vitamin E in a bottle with a dropper, alcohol or a special liquid to remove bubbles, flavor and dye.
2. Weigh the soap base. To conserve the base, it is advisable to record the weight of the soap for each mold, then you will always use exactly as much base as is required for the soap.


3. The soap base should be cut into small pieces and melted to a liquid state. The base can be melted in the microwave or in a water bath. I do it in the bath.


Soap base soap a very popular, affordable and quick way to make soap with your own hands. Once you've tried it, you can stock up. One has only to try and you will not be able to stop yourself from making handmade soap.
Soap base soap not quite natural yet, but already made with ingredients that you add intelligently. A large number of different beautiful pieces can be made from a soap base. Change color, shape, composition, make different cuts and shapes. Here your imagination is limitless.
Soap Tools and Tools
In the kitchen, everyone will have all the necessary appliances: pots, spoons and forks, knives, glass, plate, strainer, pipette and more. If something is not at home, you can replace it with a similar one or purchase it in a store.
Dishes
You can use regular kitchen utensils to make soap. After completing all the work, just wash it as if you washed it with soap.
Depending on the volume of your ideas, take spacious containers: glasses, plates and a saucepan. The main rule is that all dishes should be heat-resistant, so it is better to use with thick glass (for example, for a microwave) or special plastic for microwave ovens.
Tools and fixtures
For cutting and carrying out all work, prepare the board, better glass, it is more convenient to remove an accidentally spilled base from it. To mix the ingredients evenly, you need whisk, mixer or fork.
To measure the soap base ingredients you will need spoons: tea, dessert, dining room. They can also be used to create a soap shape.
If your soap contains lumps, use strainer and strain it before pouring into molds.
Knife must be sharp. It will be used to cut the soap base into pieces and cut the finished soap.
To create shavings or curls, you can use a special vegetable cutter knife... The curls will be thin and will not break. It can also be used to give a beautiful relief and shape to the finished soap.
To scratch off the soap, to better connect the different layers, you will need toothpick.
To accurately measure the amount of essential oil or liquid dyes in drops, use pipette.
An important thing when working with a soap base is alcohol or hard alcohol. It is used to remove surface film and unwanted bubbles. The surface needs to be sprayed, so you need spray.
The rest of the devices and tools, such as scissors, grater, pusher, will come in handy when working with various ingredients. If you need to grate, crush, chop, and so on.
How to melt a soap base
To do soap base, you must first melt it. First of all, cut a piece of the base into small cubes and place them in an ovenproof plate or glass.
There are two methods for melting the base: in a water bath and in a microwave oven.
How to melt soap base in the microwave
 The soap base is melted without adding water or other components. The base melts very well on contact with heat. Since the microwave oven heats up quickly, the soap base can be melted in 2-3 minutes. At maximum power (350W) for 100 grams, 1-2 minutes is enough.
For those who are just starting out and are not sure how to melt the soap base, we recommend setting it for a shorter time and periodically checking its condition. The temperature should not exceed 60-65 degrees, also do not allow the base to boil and boil. When melting over 100 grams, stir the base to distribute the temperature evenly every 30 seconds.
How to melt a soap base in a water bath
 A water bath is used to reduce the intensity of heat and the sudden drop from the stove. Since the soap base melts quickly, you may not notice and spoil it (it will boil, burn, begin to evaporate, and so on). During the melting stage, it is important to preserve all the properties of the base. If it is necessary to keep the base hot, you can add oils and other ingredients in a water bath.
Build a water bath using an iron pot filled with water and a heat-resistant deep plate. Boil water in a saucepan (or in a kettle beforehand) and immerse a plate with a soap base in hot water, no water should get into the base. Make a slow fire. The soap base will begin to melt and melt. As soon as small lumps remain, turn off the heat. When the base comes, i.e. the lumps will melt, remove it from the bath. A water bath will take about 10-15 minutes.
Prepare other ingredients in advance: essential oils, dyes, fillers, scrubs. Since the soap base thickens quickly, they must be added immediately and there will be no time to search.
Making soap additives from a soap base
The components are added to the hot soap base in the following order and ratio:
 1. Add 1/3 teaspoon of heavy oil to 100 grams of soap base. This oil degrades the soaping properties, so if you overdo it, stains may appear on the surface of the soap. ...
2. The soap can now be scented with essential oils (3-7 drops), food flavorings (3-4 drops), or fragrances. Oils and fragrances should not be mixed. ...
3. Now we color our soap. Add dyes liquid (1-7 drops) or powder (1 / 6-1 / 3 tsp), you can also use gloss or mother of pearl. Dilute dry dyes with water, and pigments with essential or fatty oil.