How to set up an adsl modem for games. How to set up an ADSL modem to connect to the Internet itself. ADSL splitters. Device. Connection diagrams
Now I will talk about how to set up an ADSL modem so that it connects to the Internet itself in relation to the Rostelecom provider (it also serves all the subscribers of the former UTK). Let us consider the example of the D-Link DSL-2500U modem. The ADSL modem model was not chosen by chance. The fact is that with the help of the quick installation utility included on the disk complete with the modem, there is no way to specify a login and password for Internet access. Those. when configuring, in fact, only the status of the Internet connection is checked. Therefore, you will need to create and configure a connection on your computer. Each time, after turning on the computer, you will have to connect to the Internet as they say "manually", which, in my opinion, is not convenient. It is better to configure the ADSL modem in such a way that immediately after booting up the computer, you can access the Internet without any additional manipulations. This manual is also suitable for configuring other models of D-Link modems, for example, for D-Link DSL-2540U.
So, we work in steps.
Step 1... If someone has already tried to configure your modem, it is better to immediately reset all settings to factory defaults. Take a regular match or a thin rod and insert it into the RESET hole on the back of the modem.

Press the match and hold for 7 seconds. After this procedure, the modem settings will be reset to factory settings and you will be able to connect to it.
Step 2. We enter in the address bar of the browser http://192.168.1.1 (without specifying the protocol) and press Enter. After that, a window like this should appear:

The default username and password are the same - enter admin... Click OK and get access to the ADSL modem settings:

Step 3. Add a new connection Advanced Setup - WAN - Addand configure it:

Add a new connection


Be careful when entering your username and password (username and password are indicated on the card given to you by the provider). In order not to make a mistake when entering a password, you can type it in any text editor (for example, Notepad), and copy and paste it into the appropriate field.


Your settings should match the ones below:

Check your connection settings carefully
Step 4. At the last stage, you need to save the modem settings using the Save / Reboot button:


The Internet LED should be solid green
If the Internet indicator is constantly lit red, then it is possible that you entered the login-password pair incorrectly (it is assumed that everything is fine with the line). Return to the appropriate step and check the entered data.
Evgeny Mukhutdinov
Connection to the Internet is carried out using various technologies and protocols. One of the first was the telephone line, which has remained relevant to this day. The technology using this type of communication is called ADSL2 +. At the moment, it is being replaced by more convenient and high-speed options, but in remote settlements it is still one of the main ways for wired connection to the "world wide web". Let's take a closer look at the 2640U DSL router that provides a wireless Internet connection.
The 2640U router is used for ADSL connection only.
There are four variations of this model available for purchase. Outwardly, they are indistinguishable, the difference is only in the options for hardware revisions. The DSL connection method is already outdated, but still relevant for remote villages.
It also has a wireless network connection function. That is, it is used as a wi-fi device. The characteristics of the d-link 2640u dsl router are identical to other models from the xDSL segment.
The interface of the 2640U router does not contain USB connectors, which means that there is no way to connect a 3G / 4G modem to it or perform firmware via a USB flash drive. It also does not support creating a VPN server, using it as a torrent or DLNA server. There is no possibility to make an individual configuration or change the button assignment on the equipment.
Appearance
 The d-link 2640u DSL wi fi modem is a black box with rounded edges. On the front side there are light indicators with a signature, signaling that the current connection is working. The power connector and ports are on the back along with a single antenna.
The design is the same as most of the manufacturer's routers.
All necessary cables for installing a network device are included with the dsl equipment. The main documentation and the configuration assistant are located on the disc included in the package.
Connection and preparation for work
 Before configuring the d-link 2640u router, you must connect it to electrical network... To do this, use the included power adapter. Insert the telephone cable connector into a special device - a splitter. It will allow you to divide the signal going to the wire into two: the first is responsible for the phone, and the second for providing Internet access. The last stage is the connection network cable 2640u to a network port on your computer.
Settings
There are two ways to configure a network device. Using the installation wizard from disk or through a browser in the router's menu. Let's consider each of the options in more detail.
 To configure the dsl 2640u wireless router in automatic mode, you must first run the "Installation Wizard" included on the disk with the delivery set. Next, you need to select a country and an organization providing access to the "global network".
At the next step, you will need to specify the login and password provided by the provider when concluding the contract.
After that, the router will automatically perform the necessary actions.
Connecting to the Internet manually using the example of some providers
If the first option did not help, or the user prefers to perform the configuration on his own, you must log in to the 2640U through a browser.

Now let's look at how to set up a router. dsl d-link 2640u depending on the selected provider.
"Home ru"
Officially, Dom.ru does not support dsl routers, as they use outdated Internet connection technology. But the following instruction applies.

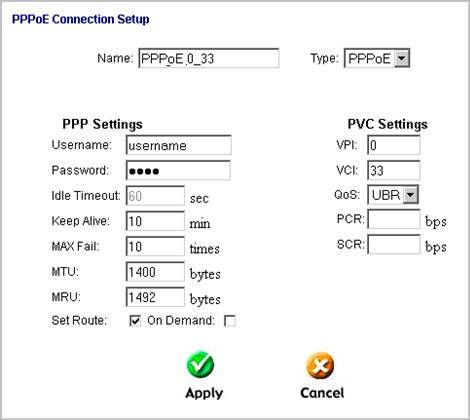
Set Connection Type to PPPoE. Interface (Interface), or connection port, DSL (New). Name - enter any value. This is just the name of the dsl connection being created.
Section "ATM":
The value of the VPI and VCI fields, which are responsible for the connection over the dsl line, should be obtained from the provider. They are individual depending on the region of residence and port on the equipment of the service provider. Leave the rest of the fields unchanged. 
Section "PPP":
In the fields "Username" and "Password" enter the data provided by the provider for the dsl-connection service. The rest of the parameters are unchanged. 
To use the IPTV function, you must check the “Enable IGMP Multicast” checkbox. 
Click the "Apply" button. In the top menu, select "System", item "Save and Reboot": 
This completes the initial configuration of the Internet on the d-link 2640u.
Rostelecom
The service provider officially supports this model. Configuring the dsl d-link 2640u router of the Rostelecom provider is identical to the above method. This is because both providers use the same Internet setup procedure.
Beeline
For dsl-router wi fi d-link 2640u, it is not possible to connect to the Internet through the Beeline provider, since it is not directly able to maintain a connection through the provider's VPN servers.
To use it, you need to purchase a second network device that supports this feature. It is also recommended to immediately select the model through which it is possible to configure the optics for the dsl d link 2640u wireless home router.
NetByNet
Adsl wifi-router d-link 2640u is not supported by NetByNet as a router for providing access to the World Wide Web. Before configuring the dsl d-link 2640u router according to the instructions, it is recommended that you first contact the provider for advice. This is due to the fact that NetByNet necessarily uses identification by the MAC address of the network equipment.
Wireless network

SSID: come up with a name wifi networks... Country: indicate the state of the user. Channel: Leave Auto.
Turning on the "Hide access point" function means that the connection is invisible when you try to find it in general search. To connect to a wi-fi network on the device, you will need to manually enter the name of the access point, specify the password for it.
Leave the remaining parameters uncorrected. Click the "Apply" button to save the changes.

Network authentication is an encryption algorithm used to secure a wireless connection. It is recommended to set the WPA-PSK / WPA2-PSK value. These are the latest unbreakable standards. In the "Encryption key" field, create a password for accessing Wi-Fi. The rules for creating it are indicated above when the process of changing the password for the 2640u network device was described. WPA Encryption: Set TKIP + AES to securely secure your AP. Leave the rest of the fields unchanged.
- Click the "Apply" button to save the configuration. Next, you need to reboot the dsl router to apply all the changes made.
The above method will be able to "on the 2640u router without much difficulty for the user.
Setting up in repeater (repeater), amplifier, adapter or access point mode
The 2640U router is configured in different modes: bridge mode, access point, repeater or wi-fi booster. This will be discussed in separate instructions for configuring these options.
IPTV
To configure IPTV on a dsl router, you must set the "Enable IGMP" parameter when configuring the Internet connection. This was mentioned in the section of the article informing about setting up a dsl connection through the Dom.ru provider.
Then you should connect the TV set-top box with a network cable to the dsl router, perform the following actions in the configuration menu:

Name: come up with any name for the connection. In the LANs section, check the box to which the set-top box is connected. In the WANs section, the bridge mode created earlier. Click "Apply".
Reboot dsl hardware required to save configuration.
Dynamic DNS
The 2640u network device supports the ability to configure a dynamic DNS server.

By default, the 2640U dsl wi-fi router suggests using the manufacturer's DDNS address. The user himself determines the most convenient service for him.
Security settings (antivirus, firewall)

Then you should click "Apply", and then reboot the dsl-router so that the changes are saved.
To enable the Parental Control function, go to the Control menu and select the appropriate option. Then click the "Add" button: 
You must specify the following parameters... "Name": come up with a name for the service. "Due days": put a tick in the checkboxes on the days for which this rule will apply. The next two sections are responsible for the time interval to the nearest minute, fill them in. MAC Address: Specify the physical address of the equipment for which this rule will apply. Click "Apply". It is best to restart the hardware to use the settings. 
Setting up the printer
The dsl modem cannot directly connect the printer. It is possible to use this equipment only for connecting to a printer via a LAN.
Possible malfunctions and remedies
If the dsl router has problems, the first step is to try to reboot the device. Another option is to reset the settings to factory defaults. How to do this is described below.
It is also worth remembering that cables can be damaged too. It is worth carefully checking all the connections on the equipment and devices connected to it. Sometimes there are situations where the problem is on the side of the ISP. Then you should call the technical support service and get expert advice.
If the dsl router is still not working, it is recommended to contact the service center. Wizards diagnose the problem and help you solve it.
Firmware upgrade
Equipment becomes obsolete over time. In order for it to last longer, it is periodically "stitched". The manufacturer posts fresh updates on the official website. For the 2640u model, download them from:
The last update dates from 2013. This means that this device is no longer supported by the manufacturer. Let's see how you can update your dsl modem.
Through the web interface
Through the menu "System", item "Software update": 
There are two update options in the window.

The current example uses a dsl wi-fi emulator of the 2640u network device, so the screen displays “Unable to check for a software update”.
Via mobile app
There is also an option to update via mobile app... It exists for Android and iOS platforms.
Unfortunately, the 2640U is not currently on the list of compatible devices. Accordingly, the user does not have the opportunity to perform this operation through the mobile application. The list is constantly growing; its status can be monitored in the app store.
Resetting the router to factory settings
Resetting the settings on the DSL 2640U device is carried out in two ways. In the first case, it is enough to press the Reset button on the back side, holding it for 10-15 seconds. A simultaneous reset of all LEDs will show that the process is complete.
The second option is through the web interface. To do this, in the upper left corner, select the "System" item, then - "Factory settings": 
Within two minutes, the network dsl device will roll back to factory configuration.
Output
The dsl Wi-Fi router d-link 2640u is a model that supports legacy ADSL technology. It is suitable for work, mainly in remote settlements of the country, where, apart from the telephone line, there are no other alternatives to wired Internet.
For tuning in a private house "D-Link" "DSL" 2640u is perfect. Nice and intuitive interface, minimum of operations. Configuration is completed in 4 minutes.
pros
The 2640u network device belongs to the line of budget dsl routers, that is, its price is acceptable.
It is possible to use it in other modes besides the router. Great alternative as an access point
Minuses
The equipment uses xDSL connection technology, which is rarely used today. For its performance on modern protocols, firmware for third-party modes is often required. However, this leads to an inoperative state of the equipment.
Rostelecom on russian market services in the field of communications is one of the leading providers. It is not surprising that many users prefer his services. In addition to everything, the company, along with the tariff package, also provides the basic equipment necessary for connecting to the Internet. But many people try to set access parameters on their own, which sometimes causes some difficulties. Meanwhile, if you look at it, there shouldn't be any special difficulties. Further, it is proposed to consider setting up any type of Rostelecom modem. This manual is useful not only for the equipment supplied directly by the company, but also for any other similar models.
Modem market overview
Before setting up the Rostelecom modem will be considered directly, it is necessary to focus on the equipment that will be used to organize an Internet connection at home or in the office.
What can be used at the moment? Among the most popular options, there are several main groups of devices:
- modem routers (DSL / ADSL);
- Ethernet modems;
- USB modems;
- 3G modems.
The first group is the most popular and is suitable for home or office installations. The approximate cost of the simplest model is about 800 rubles, but models with a higher rank will cost about 1,500 rubles.

USB routers have not received much distribution, although they are quite cheap. Their main problem is that very often there are situations with the "meeting" of drivers. 3G devices are mainly used when moving around the city with a laptop.
Which model should you prefer?
Which of these to choose for installation at home? I think the best option there will still be the use of modems that combine the capabilities of a router (for access via Wi-Fi) of a DSL or ADSL type.
Among the most frequently used devices are D-Link, TP-Link, Intercross, Zyxel, etc. The settings of some of them will be discussed later.
General rules for connecting ADSL modems
As follows from the basic understanding of the ADSL technology itself, a modem uses a regular telephone line to provide access to the Internet.

When connecting a modem to it, the best option is to install a special one, which allows you to simultaneously access the Internet and make phone calls. In other words, the telephone line is not blocked, unlike a direct connection.
The connection of all devices corresponds to the sequential scheme: computer - modem - splitter - telephone line. Actually, even a child will figure it out, especially since the splitter has two sockets for different cables, so it's simply impossible to confuse something.
Driver installation issues
After the entire circuit is assembled and the power supply is connected, you need to install a special control softwarecalled drivers (so that the operating system installed on the computer can initialize the device, and it, in turn, works without failures).
Standard models, as a rule, are recognized by the system automatically, and the installation of drivers does not cause questions. If something went wrong, you can always use a special disk that should come with your modem. If you purchase a modem from a provider other than your provider, or if you don't have a disc, you can download the necessary drivers directly on the official website.
When the entire procedure is completed and the device becomes fully operational, the Rostelecom modem should be configured directly. The first step is to access the web interface of the device itself.
Enabling and Accessing the Web Interface
As a rule, for all devices, the combination 192.168.1.1 is entered in the address bar of any web browser installed on the computer. Configuring the Rostelecom modem at the first stages involves setting the correct parameters for accessing the Internet. If Wi-Fi is supported, then these options will need to be installed.

Admin is used as the login and password that will be requested when trying to access. If for some reason the modem does not accept the entered data, it is necessary to reset all parameters by pressing the Reset button on the back of the modem and re-enter the information.
To configure any modem in the simplest case, if manual intervention is not required, you can use the disk supplied with the device, which has a specialized utility in the form of a kind of "Hardware Setup Wizard". After its start, you just need to follow the instructions of the installer.
Configuring Rostelecom DSL modem or ADSL device
But suppose the user does not have a disk at his disposal (lost, become unusable). What to do in this case? There is no need to despair, since setting up any type of equipment is quite simple.

So, for Rostelecom, setting up the D-Link modem (just take it as an example) begins with setting the connection type. It is advisable to set the value of this parameter to PPPoE and not use the "Bridge" scheme, which can block access to the Network when the main terminal is turned off.
Next, manually enter the VPI and VCI parameters, which must correspond to the selected region where the user is located (for Moscow, these are values \u200b\u200b0 and 35). These parameters must be in the contract, but they can be found in the service technical support, even just by calling the phone (although they are almost always installed automatically).
Next, you need to enter a registered username (PPP), specify a login, enter and confirm a password, select a service name, check the Keep Alive box and specify the values \u200b\u200bof the LCP interval and LCP dips options (15 and 2, respectively).
Finally, at the very bottom, you need to check the IGMP checkbox and save the changes made. After exiting the modem interface, you can use the Internet even without rebooting the operating system, but with the obligatory reboot of the modem (just press the appropriate button).
Configuring the TP-Link Rostelecom modem
With devices of this series, the situation is much simpler. The fact is that the devices themselves already have, so to speak, a built-in utility called Quick Start.

In fact, setting up a TP-Link Rostelecom modem comes down to just choosing a connection mode (PPPoE), setting a time zone and entering a login with a password. In principle, what is not the same "Setup Wizard"?
The nuances of setting the parameters "Intercross"
The settings of the Intercross (Rostelecom) modem are somewhat different from those described above.

When entering the web interface, you first need to select the launch of the "Wizard", the value of the VCI parameter, set by default to 35, should be left unchanged, and for the VPI parameter, enter the value 8.
Next, PPPoE is set in the connection type, as well as the Obtain an IP address automatically and NAT availability (Enable NAT) are marked. The address field is left blank. After that, the username and password are entered.
In the next steps, you do not have to change anything, and after viewing the information at the final step, you just need to save the settings.
Wi-Fi options
Finally, let's see what the setting of the Rostelecom WiFi modem is. In fact, such a modem can be used as an ordinary router for distributing a wireless signal.

There is nothing particularly complicated here either. Configuring the Rostelecom modem in this case involves entering the following values \u200b\u200band parameters:
- Authentication Type - WPAPSK.
- Encryption - AES.
- SSID is an arbitrary name for the connection.
- Pre-shared Key - your own password for accessing the Wi-Fi connection.
After completing all the settings, go to the Maintenance tab and use the browse button to select the romfile.cfg file with automatic add-in parameters. This completes the setup.
Brief summary
As a result, it remains to say that setting up a Rostelecom modem of any known type is not particularly difficult. The main thing is to choose the correct parameters, which were presented in the material above.
As for the choice of equipment, when using a connection from the Rostelecom provider, ADSL devices are the best option in comparison with the same Ethernet or USB devices, which are quite limited in their capabilities.
The settings of 3G-modems were not considered, since all the same, users give the main preference at home or in the office to modems that combine the functions of routers with wireless communication. Well, in terms of settings, if you advise something very simple, it is best to use the disc with the "Master", so as not to do unnecessary things. But if this is not possible, you can safely use the instructions given above.
One of the most common connection methods today is using an ADSL-type modem. Setting up this device is not difficult, you just need to have a minimal understanding of the principle of its operation, as well as own a computer at the user level.
There are still some nuances. They differ depending on the provider, since the parameters for connecting to each can vary significantly. Some may assign static IP addresses to their clients, and there may be various other configuration details. Many users want to configure the Internet through a bundle of provider-\u003e ADSL-modem-\u003e Wi-Fi router. To create a bridged connection, you must already have some networking skills. Since this kind of setting is not so easy to perform.
Equipment connection (ADSL modem, Wi-Fi router)
To connect an ADSL modem, you need not only the device itself, but also other details. Without them, connection to a PC and a telephone line will be impossible. You will need a network card and a splitter. A network card is required to transfer data between the modem and the PC. The splitter will be needed for other purposes. Even when the ADSL modem is connected to the Internet, the telephone line is available for calls. Therefore, a splitter is most often used, it allows you to connect both a modem and a regular telephone to the telephone line at the same time.

The splitter has several slots. Most often these are:
- line (for connecting a telephone line);
- modem (modem is connected);
- phone (for connecting a telephone set).
The modem is connected to a PC and a telephone line in the following order:

Login to the WEB interface
When the ADSL modem is connected, all that remains is to configure it via the WEB interface. It is typical for most models of this type of device.
The configuration is performed as follows (D-Link DSL-2500U):

Then you can configure your ADSL modem in accordance with the requirements of the provider. All old settings have been removed.
How to set up an ADSL modem in router mode
First of all, you need to reset the ADSL modem settings. Only after that you can proceed directly to setting it up in router mode.
When this operation is successfully completed, you can go to the WEB interface to start the configuration: in the address bar of the browser, enter 192.168.1.1 (for the D-LinkDSL-2500UBRU modem):


After the configuration is completed, you can safely click the "Apply" button. ADSL as a router configured. Then you can start configuring the modem via Wi-Fi.
Video: Configuring ADSL Modem in Bridge Mode
PPPoE connections
Setting up a PPPoE connection on Windows 7 is pretty easy.
To do this, you must perform the following steps in strict order:

PPPoE is a link-layer network protocol used to transmit PPP frames over the global Internet. Most often used by various xDSL services.
Wireless network
Most various devices go online using built-in Wi-Fi modules. That is why most of the users configure their ADSL modems to work with Wi-Fi routers.
You can make such a connection as follows:

Many people ask themselves the question: how to set up an ADSL modem and a Wi-Fi router in a mode that excludes the occurrence of various errors? It is quite simple to do this, you just need to carefully read the accompanying documentation.
Modem configuration in "bridge" mode
To configure an ADSL modem in bridge mode, follow these steps:

The setup is complete.
Internet parameters
Internet parameters differ for different operators. Thus, if the ADSL modem and WI-FI routers were configured to work with the Rostelecom operator, they will not work on the MGTS line.
Internet parameters for Rostelecom
The ADSL modem settings for this operator are typical:
- encapsulation mode - LLC;
- connection type - Bridge;
- VPI - 0;
- VCI-100;
- QoS - UBR.
After entering all the parameters, you must click "Apply". Configuring the Rostelecom ADSL modem, like all the others, is not difficult, you just need to correctly enter all the necessary parameters via the WEB interface.
Internet parameters for "CSO"
For normal work on the Internet through the provider "OGO" when setting up the modem, you must enter the following data:

Internet parameters for MGTS
The settings that need to be set for the ADSL modem to connect to the MGTS operator are specific:
- encapsulation mode - LLC / SNAP;
- VPI-1;
- VCI-50;
- "Bridging" operating mode.
It is also necessary to check the box confirming the automatic receipt of the IP address from the provider.
The local network
If necessary, you can easily create a local network with a general Internet connection via an ADSL modem. The best option will organize the network using a Wi-Fi router, as this will avoid cable clutter.
In order to configure a local network, you just need to perform the following steps in strict order:
- configure a TCP / IP connection (mask, DNS server);
- configure various related services (DHCP and others);
- configure the parameters of the local wireless network, while it is important to pay special attention to security (in the settings, select the WPA-PSK encryption type);
- internet connection is configured.
The circuit implemented in this way is quite simple. There are only two devices between the global network and the PC: a Wi-Fi router and an ADSL modem. Or one thing, if the ADSL modem has a built-in Wi-Fi module that allows it to work in router mode.

Setting up an ADSL modem in conjunction with a Wi-Fi router is not a big deal. It is only important to carefully study technical documentationincluded with your network equipment. And also the setup guide provided by the ISP.
ADSL technology is not new, but it continues to be used quite widely by various providers. Although it is not convenient, it requires a specialized ADSL modem. But its cost is not high, and many operators also provide this network equipment for rent. Setting up this type of connection is quite simple, it is only important to take into account all the nuances and features of creating a connection, as well as a bundle of a Wi-Fi router and an ADSL modem
>How to connect ADSL?


When people decide to host the Internet at home, they choose between several options. After all, you can put an adsl modem, a mobile modem or stretch an optical fiber high-speed internet, you can also establish a wireless connection. And this does not even affect the choice of providers that offer Internet services.
Many people prefer to install an Adsl modem, which has a number of advantages over other types of Internet, but not everyone knows how to properly connect an Adsl modem on their own.
Advantages of Adsl-Internet
Adsl-Internet is the Internet over a telephone line. Accordingly, such an Internet has a number of advantages over other types of Internet:
- For Adsl-Internet, there is no need to stretch extra wires, because the Internet is connected via a telephone line, which most apartments have by default.
- You can pay for the Internet in conjunction with your phone bill.
- Internet speed is faster than mobile internet and old generations of communication.
However, this kind of Internet also has disadvantages. The main one is that the data transfer speed is lower than that of the Internet via optical fiber. Yes, and the speed of the Internet directly depends on the equipment of the telephone operator itself. If the necessary equipment is not available, then the data transfer will be low, and maybe even the connection will be impossible.
Adsl modem connection
To connect to the Internet via ADSL modem, you must:
- We connect a splitter to the telephone line, which will divide the telephone and the Internet into separate lines.
- From the splitter we connect the wire to the modem into the required socket.
- We connect the wire from the modem to a computer or laptop to use the Internet.
After that, you only need to properly configure the modem to use it.
Setting up Adsl modem
When connecting the modem to a computer or laptop, it is important for the computer to see the hardware. If this does not happen, then you need to download the necessary network drivers or install them from the disk. After that, let's start setting up:
- We launch any browser and write in the address bar the ip-address of the modem, which can be viewed in the documentation. Typically the address is 192.168.1.1.
- In the window that opens, enter the password "1234" or the one specified in the documentation. Also, the password can be the word "admin".
- The next window is usually asked to enter a new password to enter. Some modems may not have this feature.
- In the modem settings window, set the operation mode "Bridge", VPI-0, VCI-35.
- Usually the modem receives the Internet settings automatically. However, if this did not happen, then you must enter all the provider data from the documentation in the modem settings.
- We save all the values \u200b\u200band reboot the modem.
After all the manipulations, the Internet should work stably.