This widget is a must have on every Mac. Macbook Pro cooler control CPU and card temperature mac os
Very often, laptops and desktop computers break down due to overheating of the central processor. Such breakdowns usually manifest themselves in the form of constant freezes, spontaneous reboots or shutdowns, and a blue screen of death. Reasons for processor overheating there may be several.
The most common cause of CPU overheating is contamination of the cooling system (hereinafter - CO)... Cooling system contamination occurs due to the fact that most computers use CO on an active basis. An active cooling system consists of a radiator that is cooled by a flow of cold air thanks to a fan attached to it. After a certain time, CO on an active basis becomes contaminated. This is due to the ingress of dust into the cooling system during blowing.
The next reason for overheating is breaking most central processing unit... Failure most often occurs due to the defect of the processor itself.
Also, overheating can occur due to cPU overclocking... To solve the problem with overheating and stabilize the temperature of the central processor, we have prepared a material in which we will describe in detail the solution to this problem. This article will describe the solution to the problem for computers with various operating systems. Therefore, our material will be useful for users of computers with operating systems Mac OS, Ubuntu, FreeBSD and Windows.
How to check CPU temperature on a Windows PC
If your personal computer is running an OS Windowsthen temperature determination its CPU is a fairly straightforward task as there are many software programs available to determine its thermal characteristics. The most interesting program for these purposes is HWMonitor... The utility supports all current versions of Windows, from XP to Windows 10. You can download this utility on its official website www.cpuid.com. Installing the utility in Windows is quite simple and almost any user can handle it. After installation, launch HWMonitor.
In the window that opens, you can see that the operating temperature of the processor, which the utility has extracted from the sensor, is 60 degrees Celsius. The computer in question has an Intel Core i3-530 and is running Windows 10 64 bit. Critical temperature for Intel Core i3-530 is 72.6 degrees Celsius... From this it can be noted that at 60 degrees Celsius, this computer should function normally. But what to do if the temperature rises on Intel Core i3-530 and becomes higher than the critical one, as shown below.

In this case, it's time to think about reducing this indicator.
The following image shows another HWMonitor window on Windows 10 64 bit with an Intel Core i5 3550S based system.

In this window, you can see that the average core temperature of the Intel Core i5 3550S CPU is 60 degrees Celsius. Intel Core i5 3550S has a critical thermal rating of 69.1 degrees Celsius, so 60 degrees is optimal for him, but still high. If the thermal value is above 69.1 degrees, in this case it will be necessary to reduce it to the optimum.

In addition to determining the actual temperature of the processor, in Windows using HWMonitor, you can also find out the thermal indicators of the video card, hard drive and motherboard chipset. HWMonitor utility can save all displayed information to a text file.
Besides HWMonitor, there are many other utilities for monitoring temperature in Windows. You can get acquainted with other utilities in a separate article dedicated to.
How to find out the CPU temperature on a Mac OS PC
Apple makes very high-quality and reliable computers, but their products often overheat the central processor. It follows from this that for computers with Mac OS should also monitor thermal values \u200b\u200bof the processor part... For this test, we'll take an Apple MacBook. This laptop has an Intel Core i7 quad-core processor. Also, depending on the configuration, this model can be installed Intel Core i5 or Intel Core i3. Simple and free for our task is hWSensors utility for Mac OS, which can be downloaded from its official website http://hwsensors.com. After downloading, install and run the utility.
The utility should start in a window where you can see that the temperature of the Intel Core i7 cores is on average 45 degrees. Also, to record the history of heating of computer components in Mac OS, the user can use the graphical history in HWSensors.

It can be seen from the figures above that the utility can also determine the temperature of the hard drive, motherboard chipset and video card.
From the example, it can be noted that monitoring temperature using HWSensors on Mac OS is quite simple. In addition to HWSensors for Mac OS, another utility is released called. This utility for Mac OS can be downloaded from the official website www.bresink.com.
The utility, like HWSensors, can monitor all temperature characteristics from sensors in Mac OS.

Monitoring CPU temperature on a computer running Ubuntu 64 bit
For the test, we will take a computer with a 64-bit AMD Athlon II X2 250 processor. The maximum critical temperature for heating AMD Athlon II X2 250 is 74 degrees... This computer runs on 64 bit operating system Ubuntu 64 bit. Therefore, to find out the heating temperature of AMD Athlon II X2 250, we will use the Psensor utility for 64 bit Ubuntu. To do this, start the computer and go to the Ubuntu Software program.

In Ubuntu Software, search for "Psensor".

In the found Ubuntu Software result, press the Install button, after which the installation of the program will begin. After installation, the Psensor shortcut appears in the Unity panel. Click on the shortcut, after which the program will start.

In the program window you can see that the core temperature of the AMD Athlon II X2 250 processor is 60 degrees, which is an acceptable result for it. In addition, to quickly find out how much the AMD Athlon II X2 250 temperature is, you need to click on the indicator in the form of a thermometer on the taskbar.

The example shows how easy it is with Psensor to find out the core temperature of the AMD Athlon II X2 250 processor in Ubuntu 64 bit. In the same way, as described in the example, you can find out the temperature in 64 bit Ubuntu on systems with other processors.
In addition to the CPU temperature, the Psensor utility can also find out how much the thermal performance of a video card, HDD and motherboard chipset is in Ubuntu 64 bit OS.
Monitoring CPU Temperature on a FreeBSD Computer
For the test, we will take a computer with an Intel Core 2 Duo E4300 processor running an OS FreeBSD. The maximum critical heating temperature of the Intel Core 2 Duo E4300 is 60 degrees... To find out the temperature of Intel Core 2 Duo E4300 cores in FreeBSD, you need to download module, which has support for temperature sensors... To do this, enter the "coretemp" command in the FreeBSD console:
After that, we confirm the loading of the module.
After loading the module, enter the command in the console: # sysctl -a | grep temperature This will show us the core temperature of the Intel Core 2 Duo E4300 processor in FreeBSD.

The figure shows that the core temperature of the Intel Core 2 Duo E4300 processor in FreeBSD is 39 degrees. This temperature is optimal for the Intel Core 2 Duo E4300.
The example shows that in the FreeBSD operating system there is no need to install additional utilities to check the temperature of the Intel Core 2 Duo E4300 CPU.
It is especially convenient in FreeBSD to check the CPU thermal readings on the servers, since stable operation is of particular importance on them. In addition, thanks to the advanced networking capabilities of FreeBSD, administrators have the ability to monitor the thermal performance of the Intel Core 2 Duo E4300 remotely. Taking temperature readings remotely is especially important on FreeBSD web servers, which run thousands of sites around the clock.
Checking the CPU temperature in the computer BIOS
Now motherboards from different manufacturers are released with a new UEFI BIOS... To check the CPU temperature, the UEFI BIOS has built-in utility to monitor the thermal parameters of the processor. For the test, we will consider a system based on MSI A58M-E33 motherboard and AMD Athlon X2 340 processor. Now boot into the BIOS of this system and go to the "" tab.

In the text box “ CPU»You can see that the temperature of AMD Athlon X2 340 is 38 degrees, which is a very good indicator. For the AMD Athlon X2 340 processor, the critical temperature is 74 degrees... If the permissible temperature on the AMD Athlon X2 340 rises from 60 degrees and higher, then you should think about cooling it. Besides identifying the temperature of the AMD Athlon X2 340 processor in "", you can also find out the temperature of the chipset and the fan speed of the cooler.
Also in the left part of the window on the graph you can observe the change in temperature indicators of the CPU and fan speed.
The test shows how easy it is to measure the temperature of the processor cores in the BIOS without loading Windows, FreeBSD or another OS.
Reducing the temperature of the processor cores
If you have determined that the processor of your laptop or desktop computer is overheating, then it's time to cool it down.
Hopefully in the near future, thanks to the transition to new technical processes, processors will become cold and overheating will be a thing of the past. We also hope that our article will help our readers to monitor the temperature of processor cores in Mac OS, Ubuntu, FreeBSD and Windows operating systems and prevent it from overheating.
Related Videos
Despite the fact that Mac OS X already has a standard and very functional set of utilities for monitoring the state of the system, they are sometimes not enough.
Not so long ago, I was faced with the need to find out the temperature regime of my Mac (it got very hot) and found that it was extremely inconvenient to do this using standard OS X Mavericks tools. Flipped through more than one Google page in search of a high-quality Mac temperature monitoring program and settled on Temperature Gauge 4.
The utility is available for download in the AppStore for 169 rubles. In addition to financial costs, some users may be confused by the lack of the Russian language, but trust the interface Temperature Gauge 4extremely simple and intuitive. So that a few English words do not spoil the overall impression of working with the program.
Program interface
The app displays the temperature readings of all major Mac components. You can also view the temperature of a specific item: CPU, Battery, logic board; Memory (RAM); Palm rest (the place where the wrists rest 🙂); Power supply (power supply); Thunderbolt connector, Wireless (WiFi module).
In addition to the temperature, the program shows the rotational speed of the cooler, which, as you know, directly depends on the degree of heating of the Mac. By the way, many users write to developers with a desire to add to Temperature Gaugefan speed control function, but so far the creators remain deaf to their requests.
Settings
Another advantage of the utility is the background display ( Menu Bar) in the set options menu bar. In the settings, you can set for which element (processor, RAM, etc.) temperature readings will be displayed in the menu bar.
In addition, you can choose in which values \u200b\u200bthe temperature will be displayed ( Temperature) - degrees or Fahrenheit, as well as how often the Mac temperature readings will be updated (10 seconds by default). If necessary, you can find out the temperature mode of the hard drive (Check Hard Drive temperatures), but note the warning that on some drives this check may slow down the Mac.
In the notification tab ( notifications) you can set the temperature threshold, upon exceeding which the program will show a warning. The first slider sets the limit for any sensor in the program, and the second sets the heating threshold for the CPU.
Start item ( startup) allows you to configure the program launch parameters: launch automatically, background display (menu only).
Using a tab log you can upload information about the temperature of all sensors and the rotational speed of the cooler in excel format.
IN Temperature Gaugeyou can also set the temperature threshold after which the fans will start active operation ( Fan). And also configure additional parameters for increasing the rotation speed:
1. when the average cpu temp is above ... (when the average cpu temp is above);
2. When any sensor temp is above ... (when any sensor temp is above).
In addition, it is possible to select the mode of increasing the rotation speed: (boost gradually) increase gradually and increase immediately (boost immediately)
I hope this quick overview will finally break down the language barrier when using the program and make monitoring the temperature of your Mac more effective. By the way, the reason why my Mac was very hot was in an incomprehensible process that consumed up to 78% of CPU resources, it was helped by a regular reboot. For more information on how to identify and fix similar problems, see.
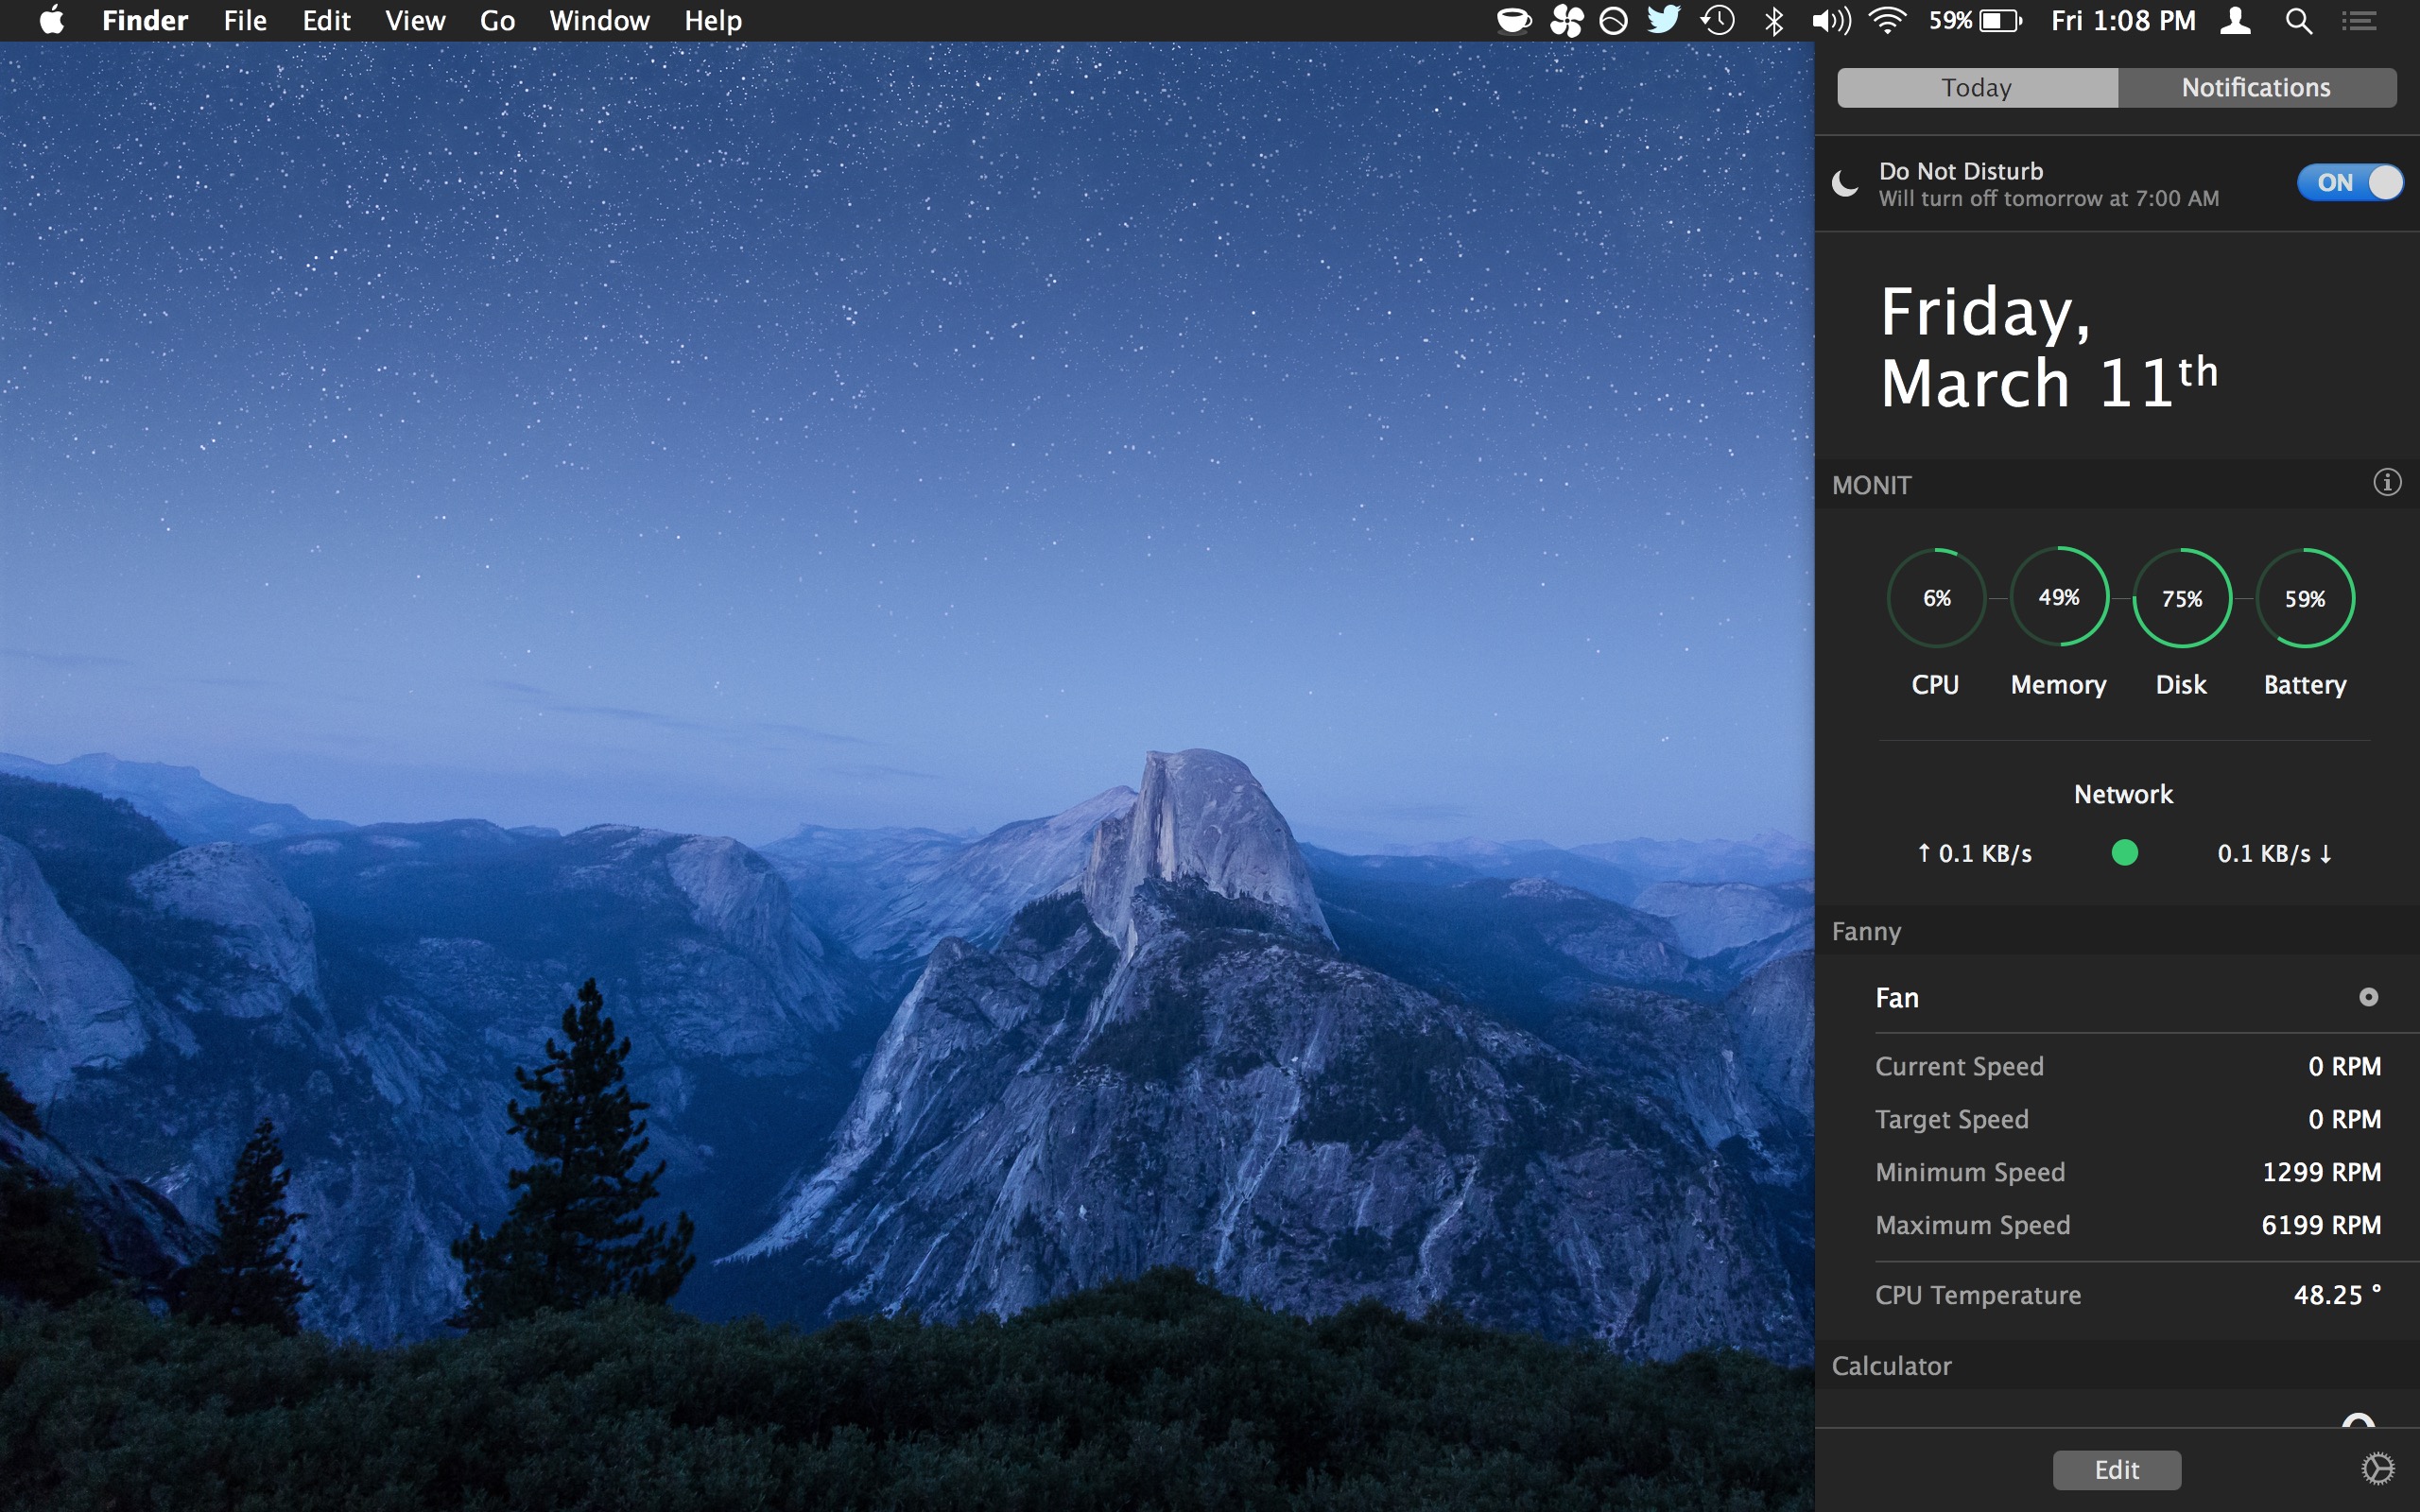
Many Mac users like to keep a watchful eye on their system stats, including processor utilization, memory usage, disk activity, network usage, CPU temperature, fan speed, and perhaps battery stats. offers one way to do this, but it’s on a limited basis, so if you’d rather see all kinds of system resource activity in a single control panel you may appreciate these two Notification Center widgets for Mac OS X.
The first is called Monit, and once added to Notification Center it offers a means of quickly seeing an overview of CPU activity, memory usage, disk activity, battery, and network activity. You can then click on any of the little activity icons to get further information about each.

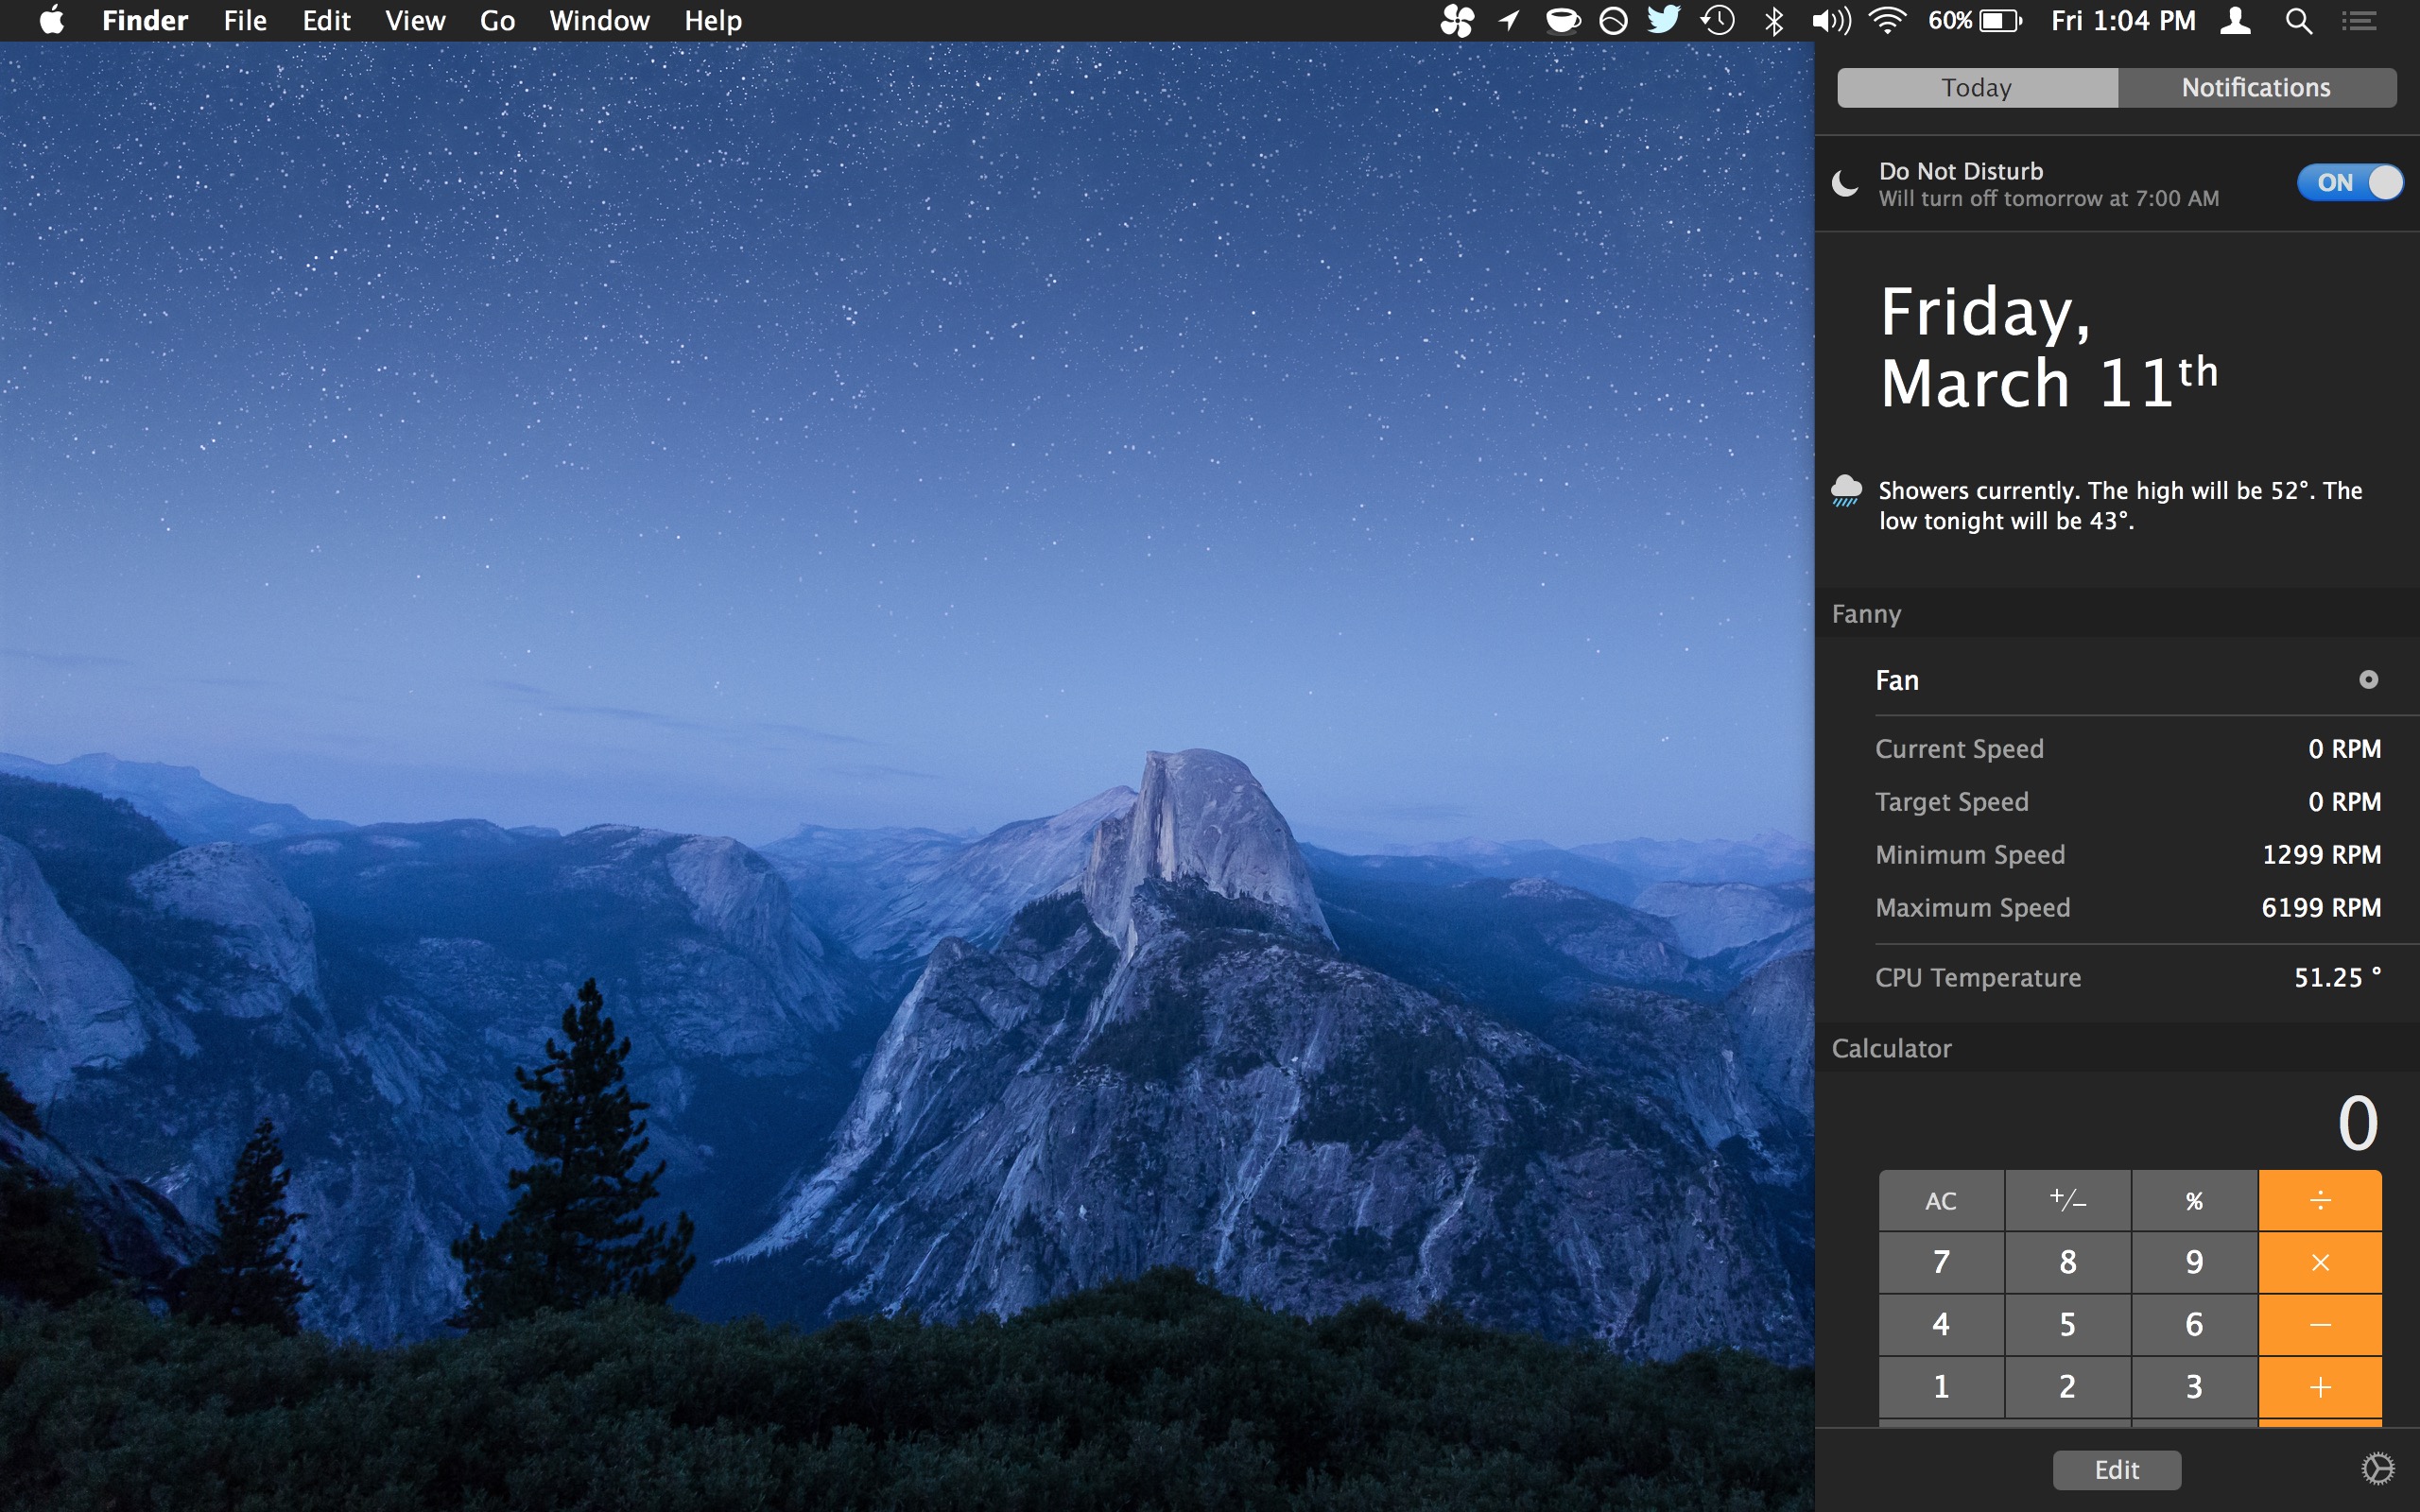
The second utility is called Fanny, and it keeps an eye on fan speed and CPU temperature of the Mac, also within Notification Center. This tool is likely most useful for Mac laptop users but many desktop users like to know what their fan is doing and what temperature the CPU is running.
- (free)
Both of these utilities are installed as usual within Notification Center on the Mac, and after you have opened the individual app you can add the widget to Notification Center by opening the control panel, clicking on “Edit”, then adding the widgets and orientating them within the Notification Center panel as you see fit. You can also uninstall them at any time through the same Edit section of Notification Center.
Do keep in mind that system activity monitoring uses a small amount of CPU itself, so if you’re really pinching for processor or resources you may not want to have these type of widgets going at all. And if you're not the type to want to install third party tools or utilities, and can offer similar functionality without any add-ons in Mac OS X, which is great if you and the whole accompanying widget thing to be a nuisance or useless ...
-
I think the OP Ted is referring to the steps one needs to take to install the app, not the feature you mentioned that becomes available only after Fanny is installed.
To install Fanny in Mojave, place the app in your / Applications folder, open the Notifications page on your desktop, scroll down to the very bottom of the page, click on the Edit button you should there, locate the Fanny app in the list of widgets at the top of the same page, then press the green + button to activate Fanny. A small fan icon for Fanny will then show up on the toolbar at the top of your desktop screen, providing a simple dropdown menu.
I’ve just installed Fanny v1.03 on my new Mac mini. The temperature shows up, but the huge fan speeds it lists are totally nonsensical for that machine.
I also tried “Macs Fan Control” and it has the same problem, otherwise it is good.
Best app of this type was Lobotomo Fan Control but it no longer works due to OS X changes. It had automatic fan speed control based on temperature.
So I am using smcFanControl for now, low Idle Wake Ups. But no automatic fan speed control.
I feel that the standard Mac cooling sometimes lets my 2011 Mac Mini get too hot (99C) by waiting too long before increasing fan speed, which is why I am interested in these utilities.
Thanks for this. I never knew about Monit, until now. I’ve been looking for a suitable replacement for, the long-outdated and unsupported, iStat Pro widget. I liked the Dashboard widget and having all of the system stats available at the push of a button. The developer’s successor, iStat Menus, never interested me. It just seemed clunkier and I really didn’t want dozens of bars and graphs clogging up my menubar. Swiping open the Notification Center (the Notification Center is, pretty much, the new Dashboard) to view this info is preferable to me. And “free” doesn’t hurt, either. I'm giving this a try to see how I like it.
That's a poorly named app. In most of the English speaking world, N. Americans excepted, “fanny” means “vagina”. Yes we do get quite a laugh about visiting Americans when they talk about their funny packs. I can’t see this being installed on my laptop.
In the USA “fanny” is slang for butt, so yes I agree it’s a poorly named app… even if the Australian or American versions of the word can indeed be windy… OH dear
That’s not my understanding, and I’ll elaborate. For reference, I’m running MacOS Sierra 10.12.6, and I’ve had Fanny for years.
I've never gotten a notification from fanny, but after installation, a teeny little fan icon appeared in the little bar at the top of my screen (to the left of the wifi, battery, and date and time graphics).
If I click that icon, a little drop-down appears giving me the speeds of both my fans and the CPU temp. That dropdown doesn’t auto-refresh, so it’s not perfect, but if you click that icon repeatedly, the dropdown will refresh once per second.
Hope that helps!
I've been using iStat Menus for a few years now. It's similar to this. If you don’t know what all of these system stats mean, you’ll drive yourself nuts watching them. The CPU, memory, and other stats frequently go through highs and lows all day, and this is normal. If you don’t understand that, you’ll think something is wrong.
Fair, not overpriced or understated. There should be prices on the Service website. Necessarily! without "asterisks", it is clear and detailed, where it is technically possible - the most accurate, final.
If spare parts are available, up to 85% of complex repairs can be completed in 1-2 days. Modular repairs take much less time. The website lists the approximate duration of any repair.
Warranty and liability
Any repairs must be guaranteed. Everything is described on the website and in the documents. The guarantee is self-confidence and respect for you. A 3-6 month warranty is good and sufficient. It is needed to check quality and hidden defects that cannot be detected immediately. You see honest and realistic terms (not 3 years), you can be sure that they will help you.
Half of the success in Apple repair is the quality and reliability of spare parts, so a good service works with suppliers directly, there are always several reliable channels and your own warehouse with proven spare parts for current models so that you do not have to waste time.
Free diagnostics
This is very important and has already become a good form for the service center. Diagnostics is the most difficult and important part of the repair, but you shouldn't pay a dime for it, even if you don't repair the device as a result.
Service repair and delivery
A good service appreciates your time and therefore offers free shipping. And for the same reason, repairs are carried out only in the workshop of the service center: correctly and according to technology, it can only be done at a prepared place.
Convenient schedule
If the Service works for you, and not for itself, then it is always open! absolutely. The schedule should be convenient so that you can be in time before and after work. Good service works both on weekends and on holidays. We are waiting for you and working on your devices every day: 9:00 - 21:00
The reputation of professionals consists of several points
Age and experience of the company
Reliable and experienced service has been known for a long time.
If a company has been on the market for many years, and it has managed to establish itself as an expert, people turn to it, write about it, and recommend it. We know what we are talking about, since 98% of incoming devices in the SC are being restored.
Other service centers trust us and transfer complex cases.
How many masters in directions
If you are always waiting for several engineers for each type of equipment, you can be sure:
1. there will be no queue (or it will be minimal) - your device will be taken over immediately.
2. You are handing over your Macbook to a Mac repair expert. He knows all the secrets of these devices
Technical literacy
If you ask a question, a specialist must answer it as accurately as possible.
So that you have an idea of \u200b\u200bwhat exactly you need.
They will try to solve the problem. In most cases, the description tells you what happened and how to fix the problem.
There are a lot of reasons why you might want to check the CPU temperature on your Mac. You might be benchmarking a new machine you bought, or maybe you’re just trying to figure out when the fans kick in. Whatever your reason may be, the problem is that Macs don’t natively offer a feature to check the CPU temperature. Don’t worry, though, in this article I will tell you how you can check the CPU temperature on your Mac, using third party CPU temperature monitors, and a simple Terminal utility.
Check CPU Temperature on Mac with Fanny
One of the best methods to monitor CPU temperature in Mac, is by using Fanny. This app has been developed by Daniel Storm, is available for free and supports macOS Sierra. Along with CPU monitoring, Fanny also lets you check details around the fan. Once you download this app, you can simply move it into the Applications folder, and launch the app.
The app launches as a menu bar icon, which displays information such as the current fan speed, along with the maximum fan speed that can be attained. Below that, you will see the CPU temperature for your Mac.
The app comes with a Notification Center widgetas well, which you can enable by following the steps below:
1. Go to the Notification Center, and on the bottom, click on “ Edit“. It may read “ 1 New“, Instead of Edit.

2. Click on the “+” icon next to “Fanny” to add it to your Notification Center.

That’s all, you will now be able to see your Mac’s CPU temperature in the Notification Center... This is easier than having it up on the menu bar, because all it takes to launch the Notification Center is a two finger swipe from the right edge of the Mac trackpad.

Check Mac CPU Temperature from Terminal
If you’d rather use the Terminal to check the CPU temperature on your Mac, you can simply follow the steps below:
1. Download the source code for osx-cpu-temp from the GitHub repository, by clicking on the “ Download"Button, and then clicking on" Download ZIP“.

2. Unzip the archive you just downloaded. Then, launch Terminal, and navigate to the directory where you extracted osx-cpu-temp... You can use the “cd” command for this. “Cd” into the folder that was extracted from the ZIP file, and then type “ make“. This will build the app, and you can then run it.

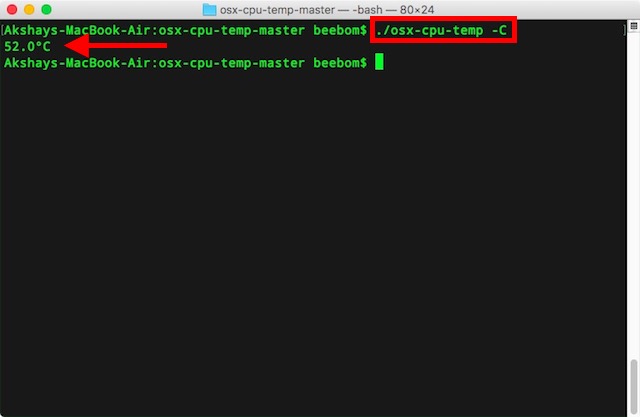
To run the app, you just have to type “ ./osx-cpu-temp“. This will display the CPU temperature in the Terminal.

If you want to change the units being used, just use the command as follows:
- “./osx-cpu-temp -F”To display the temperature in Fahrenheit

- “./osx-cpu-temp -C”To display the temperature in Celsius
Note : You will always have to navigate to the “osx-cpu-temp” directory, to run the command. If you don’t want to do that, you can add the path to the directory to your $ PATH environment variable. Then, you can simply run the command as “osx-cpu-temp” to get the CPU temperature.
Easily Monitor the CPU Temperature on Mac
You can use these methods to easily check the CPU temperature on your Mac, either from the menu bar, the Notification Center, or from the Terminal. I tried all the methods on my MacBook Air running macOS Sierra and they worked fine. There are a lot of other ways that are available, but most of them are either paid, or require a lot of work to set up, and are beyond the scope of this article. However, if you know of any method that is simple enough to be covered in this article, do let us know about it in the comments section below.