Bird feeder made from tree branches. Original do-it-yourself bird feeder. Teapot
The feeder is not only a great way to feed our bird friends. If you take a creative approach to making it, you can create the present. We offer a selection of ideas that will tell you how to make a bird feeder with your own hands. And master classes from the HomeMyHome.ru editorial office will help you learn the intricacies of manufacturing and reveal the secrets of building drawings.
Depending on what goals you pursue in the manufacture of the feeder, the following types of its design differ.
- Tray. The simplest type of feeders. The elementary design implies a small pallet with sides, fixed to a tree with a strong thread or fishing line;
It is not difficult to make such a "pelvis", especially if you have a regular and linen rope at hand. Of the minuses, it can be noted that in a strong wind, such structures topple over, and all the food is on the ground.
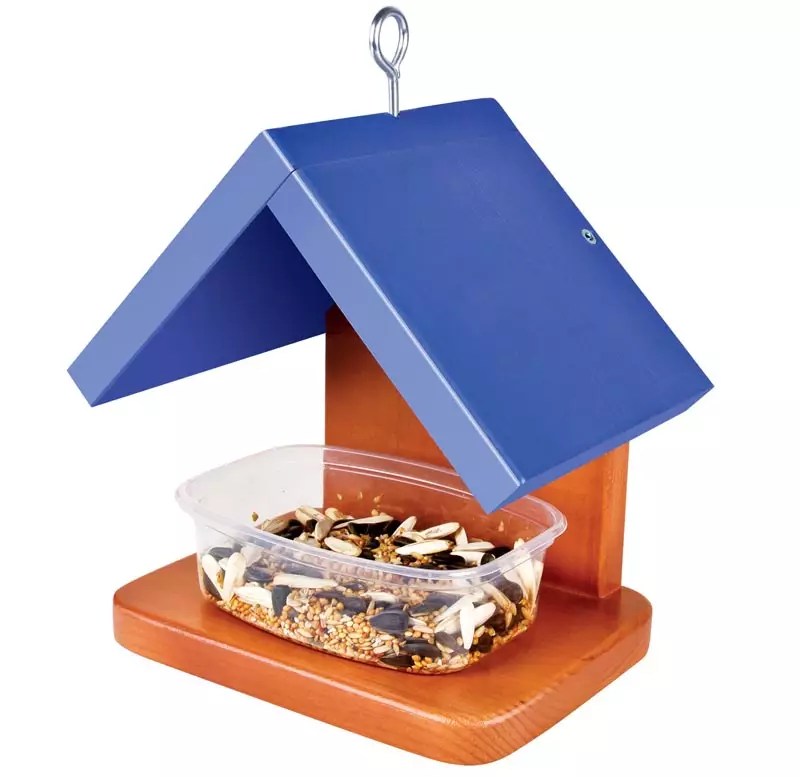
- Dispenser platforms - an improved model of the previous type of feeder. It is a tray where the birds will regale, and an airtight container with a mechanism for gradually feeding feed as it decreases. As a rule, the dispenser is made from an ordinary plastic bottle, fixed to the tray with the hole down at a short distance so that the feed spills out on its own. Of course, making such feeders is more difficult, but the end result is a high-quality, comfortable and durable design.
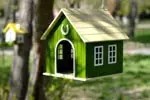
- Small houses − the most common feeders of all species diversity. In addition, if you are creative about the creation, you can make a real shelter for birds and an original one for yourself.

- Bunker feeders are somewhat similar to birdhouses. They are completely enclosed structures with "windows" for birds. If provided, then the birds will even be able to hide in them from the weather, and not just have a snack.
1 of 6


Inspired by the idea of \u200b\u200bcreating simple feeders? If yes, then our small master classes are for you.
Related article:
How to make a birdhouse yourself, how to decorate and install it correctly, photo examples of creative houses - read our publication.
How to make do-it-yourself feeders for street birds - description and drawings
As we have already seen, you can make feeders from completely different materials - literally, everything that is at hand. Wood is a little harder to work with. But nothing is impossible, the main thing is that there is a desire. Consider different versions of bird feeders.
Interesting do-it-yourself bird feeder made of wood
We offer a step-by-step instruction on how to make a beautiful bird feeder house on your own, as in the photo below.

The main material is small logs that can be cut from ordinary cuttings or rakes. Fast, cheap and original. All other parts are also made of wood. To bring to life such a masterpiece, in addition to raw materials, you will need a special drilling machine for wood and. Without them, it will be possible to do, but not the fact that it will turn out as neatly and beautifully.
| Illustration | Description |
 | We cut 30 cm long logs from the cuttings.There should be 36 pieces in total. 24 pieces - for walls, and parts from logs for pediment. Leftovers are spare parts in case of damage to key elements. |
 | We are preparing a machine with a crown for wood of a suitable diameter in order to make recesses in the logs, which will serve as a fastener for the future feeder. |
 | To make the parts similar, and the fastening grooves to fit perfectly together, it is best to make paired holes. To do this, we fasten two blanks together with tape on both sides for better fixation and measure 3 cm from both ends. |
 | We make holes on the machine in the logs fixed to each other at both ends. |
 | To assemble the house, you will also need round wooden sticks. Sushi sticks are ideal, but not flat, but round. In accordance with their diameter, we make a hole in each groove of the log. And we begin to collect the walls of the house. |
 | When finished with the construction, make sure that all the walls are level, and glue the logs together. |
 | Cut out a template for the future roof from plywood. The size and slope depend on the design of the resulting frame of the house. |
 | Cut the logs on both sides obliquely according to the template. We make a hole in the middle for the stick and glue the resulting structure. From the front side, if desired, we make a hole in the "attic". Also, to give the structure rigidity, we start up the transverse beam and glue it. |
 | The roof can be made from any sheet material available. In our case, we used moisture resistant plywood. Small parts were cut to fit the size of the resulting house. |
 | We proceed to the decor of the house - doors, visor, attic. All this is done by hand from the remains of plywood. In handicraft stores, you can buy various decorative items, such as a door lock. In our case, the door is simply glued to the wall. |
 | We make a pallet for a house from ordinary ones. |
 | Best of all, they are not easy to twist together, but to glue them, as shown in the photo. |
 | We paint over the house, we make the sides on the pallet so that the food does not spill out, and you can hang the resulting one in the garden. |
If you have any questions, you can find answers to them in the provided video material.
DIY bird feeder made of plywood
To make a plywood feeder, you need special tools to work with it, such as a jigsaw, wood glue, tape measure, pencil, building corner and glue. Let's make a small bunker feeder, approximately as in the drawing below. It was simplified a little by placing only two walls, which will be held together, forming a triangle shape.

All work takes place in several stages. Cut out the necessary parts with a jigsaw. Their sizes and shapes are shown in the photo below.

Along the edges of the bottom, we attach blocks so that their total height is approximately 5-7 cm.
Attention! On the side with a length of 27 cm, we mount the blocks so that we get small indents along the edges - no more than 7 mm.

To the side where the indents are obtained, we mount the side walls. To make the whole structure stable, we strengthen it along the connection of the side parts with a bar.


Treat the resulting feeder with impregnation so that the plywood does not deteriorate as long as possible under the influence of precipitation and temperature extremes.
How to make a feeder out of the box - simple and fast
A bird feeder from a cardboard box is an option for those who want to do everything as quickly and simply as possible.


It remains only to choose a sturdier box, cut a hole in it for the birds, work out the mounting method - and the structure is ready. It is a pity that she will lose her shape very quickly. But this case is fixable and practically costs nothing.
Master class on how to make a plastic bottle feeder
Plastic bottles are one of the most common recycled materials, suitable for making all kinds of useful things with your own hands. Feeders are no exception. We offer step-by-step instructions for making a cute and durable feeder. This will require:
- plastic bottles with a volume of 1.5 and 2 liters;
- scissors;
- lighter;
- spray paints;
- glue gun;
- glue "Moment";
- wire.

| Illustration | Description |
 | We cut out the bottoms of three two-liter bottles. To make it look more interesting, you can cut out the edges with petals, burn with a lighter, getting a wavy edge. |
 | In the middle of the bottoms we make a hole and string them onto the wire. |
 | We cut off the top of a 1.5 liter bottle and, like the bottoms, process the edges with a lighter. |
 | We string the neck onto the wire and paint the resulting structure with paint. |
 | With a swab, paint over the edges with a contrasting color. |
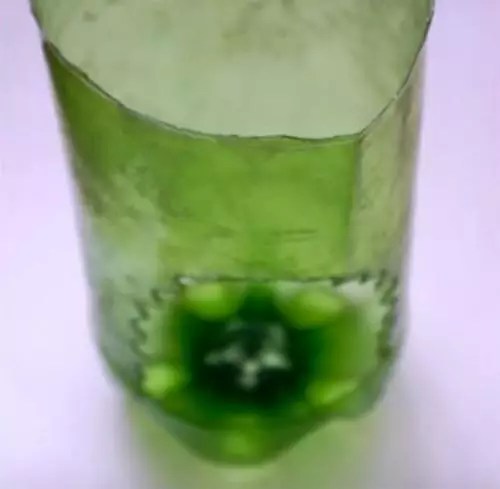 | Cut out the lower part of the 1.5 liter bottle, cut a hole and also singe it with a lighter. |
 | We connect the lower and upper parts with a glue gun. |
 | We cut out the grass from the remains of the bottles. And attach them to the bottom with a glue gun. |
The bird feeder is ready. We put more food there and observe the increase in the bird population in your garden.
The bird feeder performs several functions at once. First, it is a place to save birds from starvation. Secondly, the feeder - decorates the exterior, gardens, parks, or simply streets. Thirdly, making a feeder is quite an amusing process that unites parents and children and teaches the younger generation about the norms of behavior and human qualities. Therefore, whenever possible, we recommend building feeders, and we will learn how to do this further.
How to make a bird feeder with your own hands
We suggest that you familiarize yourself with the main variations of bird feeders, which are most often used for feeding them in winter.
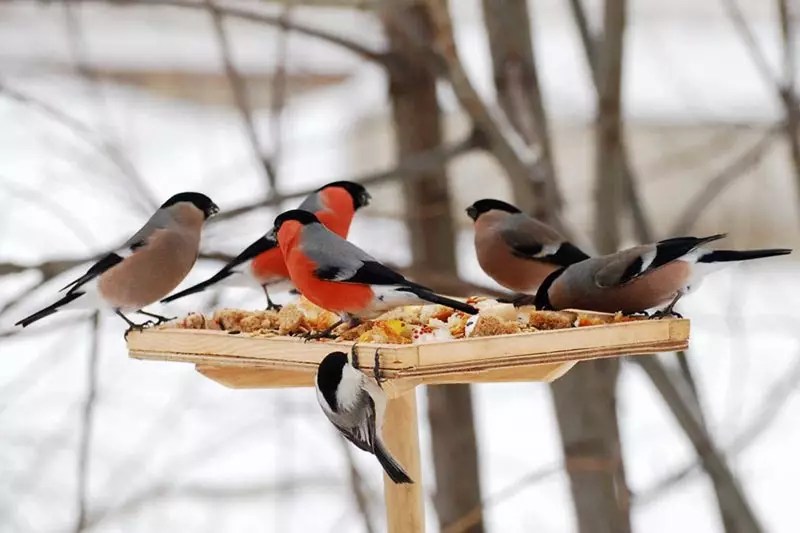
The first and easiest option is to make a roofless forest dining room. It has a flat shape with edges to prevent the feed from spilling out. This bird canteen is good because it attracts birds, since they do not like closed areas. The disadvantage of the feeder is that the food, under atmospheric influences, quickly gets wet and deteriorates, and the wind easily turns such a dining room. For the construction of this variation of the feeder, one piece of plywood and bars that serve as a frame are enough. The feeder is fixed with a regular rope, so that the feeder attracts birds, paint it in a bright shade.

A do-it-yourself bird feeder made of wood with a roof is a more stable option. On a regular base, four support posts are installed, and the roof of the trough is fixed on them. The top piece for the roof should be slightly larger than the bottom to protect the feed from rain and snow. This version of the feeder is also a simple one and does not require any special experience in working with wood. Among the disadvantages of this design, we note that snow accumulates on a flat roof, the feeder becomes heavy in weight, and can fall from a tree. Therefore, it is recommended to periodically clean such a feeder from snow or install a pitched roof.
If you have a sunflower or large berries at home, which the birds can eat, it is enough to treat the birds with them. A variation of the manufacture of rowan beads or beads from cones is possible. You can build such a feeder from scrap materials. For example, you can stack treats in a regular netting that sells tangerines or oranges. You need to hang such a gift on a regular rope. Another way is to add wheat or other grain delicacy to unsalted melted lard; after hardening, a small ball must be made from this mixture, which is installed in any place accessible to birds. The congealed fat holds back the grain, which the birds gradually eat.

An additional roof can be added to protect the feed in the tangerine net. Thus, food will not be exposed to moisture and snow. Periodically, such a feeder needs to be filled with new feed. It is possible to supplement the main feeder with additional feeders with nets, in which there is a variety of delicacies. These feeders are a great place to feed small birds.
If you have a coconut shell at home, you can also build a small feeder from it. It will be a natural addition to any tree, and will not stand out too much against its background. Two round holes must be cut in the shell. We also recommend placing grain mixed with melted fat inside the trough. This variation of the trough has an unusual and original design. If the house has a steel mesh with a small section of cells, you can also build a feeder from it. Select the diameter of the feeder individually, try not to make it too large, as a lot of feed makes the structure heavier. Make a protective cover on this feeder to prevent spoilage of the feed.
There are many ideas for do-it-yourself bird feeders, it is enough to dream up and acquire the necessary materials. A feeder can even be built from a branch cut. It is enough to connect several such parts together to form the bottom of the feeder. The roof is made in the same way.
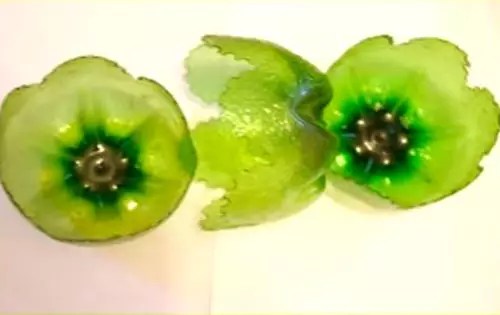
Some craftsmen make feeders from ordinary glass jars. They set them at a certain angle and put food inside. You can paint such a feeder using special paints for glass surfaces. In the same way, you can make a feeder from the old part. It is better to pour food into it gelatinized, pre-poured with melted gelatin. In the same way, you can make attractive bird feeders ornaments. For example, a solution of gelatin and various seeds is poured into a silicone mold, after solidification it is possible to obtain beautiful heart-shaped, star-shaped, semicircular, etc.
Beautiful do-it-yourself bird feeder
We offer a variation of creating a cereal canteen for birds with our own hands. For this product, it is enough to use feed, while the feeder perfectly complements the exterior of the garden and becomes its decoration. When performing the workflow, you will need accessories in the form of:
- a variety of small-sized feeds, most often cereals or cereals are used;
- eggs;
- oatmeal;
- flour;
- gelatinous composition;
- pencil;
- dense cardboard base;
- scissors and thread.

Using a pencil and cardboard, come up with a shape for the future product. There is a variation of making a canteen for birds in the form of a star, polyhedron, oval, circle or heart. Using scissors, cut out the previously prepared drawing.
Prepare materials to act as bird food. The option of using various grains or bread crumbs is possible. Using a needle, put a thread on the future sketch, which will later fix the feeder in the trees. In order to firmly hold the grain on the trough, it is necessary to connect them with a natural adhesive.
To prepare it, combine the ingredients in the form of:
- two tablespoons of oatmeal, chopped into flour;
- one egg;
- one teaspoon of honey;
- a few tablespoons of flour.
After connecting all the components, leave them for half an hour and only after this time, combine with the previously prepared feed.

First, the base of the workpiece is coated with an adhesive. In a separate container, all feed ingredients are bonded with glue. Roll the workpiece in the resulting composition on both sides. For faster solidification of the feeders, place them in the refrigerator for 2 hours.
In the absence of any of the ingredients of the adhesive composition. You can prepare natural glue in another way. To do this, just take one pack of gelatin and soak it in warm water, according to the instructions on the package. Small grain products are combined with the solution and placed in the refrigerator for solidification.
This composition can be put in an old cup or glass, they are also fixed to the trees with a rope. Such a poultry dining room is quite easy to manufacture, but at the same time it is an excellent place for feeding birds in the winter season.
We also offer to prepare materials in the form of:
- three flat candy boxes;
- glue;
- scotch tape;
- ropes.

In order to build this feeder, it is enough to connect two boxes of candy together with an adhesive solution. Moreover, they must form a roof. The third box is used as the bottom of the trough. This variation of the feeder is quite easy to manufacture, but at the same time it is an excellent place for feeding birds. To protect the cardboard from moisture, the feeder is covered with tape from all sides. In order to fix the feeder on the tree, a rope is additionally attached to it. You can trim the feeder with colored paper, in accordance with the selected design. The only drawback of such a feeder is its light weight. It is unstable and does not hold well.
Make a bird feeder with your own hands photo:

We offer another not difficult variation for creating a bird's dining room. To do this, you must use a box for any drink. The upper part of the box is fixed to the tree with a cord, and a hole is cut out on the lower part for feeding and eating food. It is recommended to additionally glue the box with scotch tape, in order to avoid its destruction under the influence of water.
DIY bird feeder - original ideas
There are many extraordinary ideas for creating avian dining rooms. Most often, these exterior elements are made of wood or plastic. We suggest that you familiarize yourself with the variation of the PVC feeder structure.
When performing the workflow, you will need:
- scissors or knife;
- a plastic tank with a volume of five liters;
- wire.
In addition, food for birds should be prepared, which will be located in the forest dining room. Using a utility knife or scissors, cut a round hole in the bottom of the container. The diameter of the opening should be such that a bird can easily fly into it. It is possible to vary the construction of several windows at once through which the feed will be fed. The upper part of the container is twisted with wire and installed on a branch. To make the finished product heavier, use plywood or similar material that fits on the bottom. This bird canteen has a roof so the food for the birds will not get wet. In addition, the presence of large holes is a guarantee that there will always be a lot of birds in your feeder.

A variation of the design of a bird feeder with your own hands using PVC bottles is possible. When working on a dining room for birds, you will need to prepare materials:
- PVC bottles;
- wire;
- two spoons made of wood.
Using a knife or scissors, make an opening in the tank so that you can push a wooden spoon through it. 5cm higher, make another identical hole. Set up spoons and add food to the bottle. On one side of the spoon, which rests on the bottle with a wide edge, make a hole with a larger diameter. Thus, food, as the birds eat it, will spill out of the bottle. The top of the container is fixed to the tree most often using wire or rope.
DIY bird feeders photo:

An easier variation for making a bird's canteen is to cut a small door in a PVC bottle. In order to avoid injury to birds in the process of entering the feeder, all edges of the hole are sealed with electrical tape. Food is poured directly into the container.
Original do-it-yourself bird feeder
In the process of creating a wooden forest dining room for birds, you need to stock up on tools in the form of:
- wood or plywood;
- hammer with nails;
- bar;
- screwdriver;
- compounds to protect wood from high humidity.
Using plywood and board, use a screwdriver to cut out the base for the feeder. The second part should be the same shape, only slightly larger. Thus, it will protect the feeder from moisture. Saw the timber into several parts, from them you need to make the sides for the feeder.

To fix the timber, use fasteners and a hammer. A wire or cord should be fixed on the roof, which will hold the roof on the branches. To connect the roof and the bottom of the forest dining room with each other, use additional supports installed in the corners, or two in the center. Open the feeder with an antiseptic, which prevents its destruction under atmospheric influence, it is additionally recommended to varnish the feeder.
Please note that it is strictly forbidden to feed birds with fresh bread, rye breads and flours, citrus fruits, salty foods, toasted seeds, oatmeal. These foods will not do any good to the birds, only harm them.
Various types of grains, wheat, nuts, fruits, dried products, bacon, mountain ash with viburnum, etc. are used as food for birds. A beautiful bird feeder will decorate any interior with your own hands, children will be happy to watch how the birds eat their food and are happy that they are being taken care of.
DIY bird feeder video:
In today's article we will look at the topic - how to make do-it-yourself bird feeders. Photos, original ideas, you can take note of. Don't forget to bookmark the link to the article about feeders.
The birds may die, not survive the cold winter. Another reason for their death may be the lack of food. Feeding birds is an important and noble cause. In addition, hand-made feeders will successfully fit into the atmosphere of your personal plot and decorate its territory. Feathered friends, in turn, will help you in the fight against pests, thereby preserving your harvest.

Don't limit your imagination. The feeder can be made of any material, the main thing is to make it reliable and durable. But don't forget about safety. The bird hole can be treated with resin and duct tape to protect feathered guests from injury and cuts.


The birdhouse should be located in a convenient location. Do not hang it in an area thickened with trees, in places of strong drafts, as well as where cats are walking. Place the birdhouse in an open, viewable area, and feathered friends will immediately notice their home.


You can do the exciting business of creating a birdhouse with your children and take your creation to school, kindergarten. They will love the creative activity and have fun together!
How to make a bird feeder from a 5 liter plastic bottle
This craft is easy to do. Your child is already in 1st or 2nd grade, he can easily cope with this task.
Prepare the following items:
- screwdriver;
- rope;
- plastic bottle;
- scissors (office knife);
- pliers.
Work process:
- We cut out windows on each side in the bottle. To do this, make 3 cuts, the underside of the door must remain intact.
- Bend the door down with pliers. It turns out a platform for birds, where they will land for food.
- Remove the bottle cap and make a hole in it with a screwdriver.
- Preparing the rope. Fold it in half (if required, repeat the procedure) and push it into the gap made in the lid. Tie a knot at the end of the rope and screw in the lid.
- We fill in the seeds and hang the finished product.


DIY bird feeders - original ideas
The feeder can be built from any material at hand, even from the seemingly most unexpected. For example, from toilet paper rolls.
From toilet paper rolls
To make it, we need:
- peanut butter;
- rope;
- knife;
- cardboard sleeves;
- branches;
- plate;
- birdseed.
Manufacturing process:
We take a couple of branches and fasten them with hot glue. You can connect them by tying them with a rope. And also another option is possible. Just punch 4 holes in the cardboard sleeve to fit the branches (2 higher and 2 slightly lower). Choose for yourself any of these methods of fastening branches.
- Apply the peanut butter to the cardboard sleeve using a knife.
- We dip the sleeve into the feed.
- Repeat steps 2 and 3 for the rest of the bushings.
We tie a rope to the branches and hang the structure.


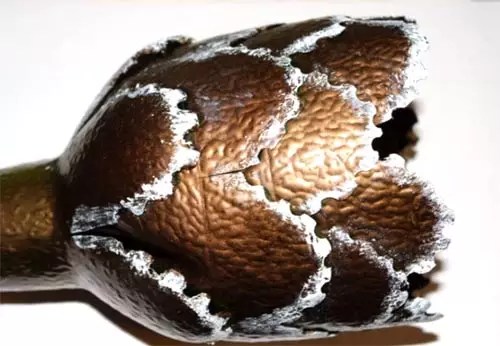
Original pumpkin ideas
The original tank with poultry food can be made even from pumpkin.
For this we need:
- wire;
- wooden sticks;
- screwdriver:
- pumpkin.
Manufacturing procedure:
- Cut off the top of the pumpkin and remove the pulp from it.
- With a screwdriver, make 4 slots in it for wooden sticks (2 higher and 2 lower, the sticks will be located at different levels).
- We take a wire and wrap each end of the sticks with it, then it will be convenient to hang the pumpkin on a branch. We connect the wire, hang the pumpkin evenly, you can twist it with a hook.


With a little ingenuity, make an excellent feeder, perhaps even from an old log.
You just need to cut out the core, a free space for food and feathered guests is formed. The main thing is to choose a solid suspension. A chain is fine for this. It will reliably withstand the structure and look beautiful.

From old dishes
Are there old dishes? From it, you can also make an original shelter for birds. And at the same time you will be able to decorate your garden with such an interesting solution. Simply glue the cup and saucer together and position the structure on the branch, attaching any pendant.


You can build a tiered pyramid using a plate, saucer, and cup. The plate should be on the lower level and the saucer slightly higher. Then you will have a feeder and drinker. You can choose a decorative chain as a fastener.
From ice cream sticks
Do you like popsicle? Do not rush to throw away the wooden sticks from it. After all, an interesting version of the feeder can be constructed from them.
Prepare:
- rope;
- popsicle sticks;
- glue.
We start the manufacturing process:
We lay out the sticks one after another in one row.
- We fasten two sticks on opposite sides with glue so that the row does not fall apart. Then we repeat the procedure from the reverse side.
- We build a fence of sticks and fasten them with glue. A large stick can be placed at the bottom of the structure. It will serve as a perch.
- We pass the rope and the craft is ready! It can be painted in any color you want.

Original feeder made of polymer clay
To make such an unusual polymer clay feeder, take:
- a piece of fabric;
- rope;
- wire;
- cookware that can withstand the heat in the oven;
- polymer clay.
Work process:
- Roll out the clay on the table. The layer should be 6 millimeters thick.
- We place the clay in the dishes, which we will send to the oven. We cut off all unnecessary, forming smooth edges. We make 3 large holes into which the rope will be inserted.
- We send the dishes to the oven. Pre-read the instructions for using the clay, correctly timing its baking in the oven.
- We take the hardened form out of the plate and tie 3 pieces of rope to it. We tie knots at the ends of each segment. The other ends should be threaded through the holes.
- We connect the pieces of rope with a wire or an aluminum piece.

Put a small piece of material inside the plate, the birds will not be able to peck on the clay bowl, being carried away by absorbing food.
From coconut
Coconut can be a great bird food. The main thing is to make the door in a strong shell. Only an adult can cope with this, using a special tool.
Once the hole is drilled, the pulp must be removed from the coconut. The rope hole is much easier to make.
We push the end of the rope into the hole made in the upper part of the nut and make a knot.
We hang a nut on a tree and fill it with seeds. If you drill a smaller door, then it is quite possible that the birds will find their warm home and settle in it. It turns out to be a wonderful dining room and hotel room for our little friends.


You don't have to get the coconut pulp. The birds themselves will cope with this task quite successfully!
Jar feeders
Do you have metal cans lying around at home and at your dacha? They can go into action. After all, they are a fairly durable material.
Let's start making the feeder:
- Take cans, paint, colored tape, glue, and wood sticks.
- Paint the cans in bright hues to attract birds to eat.
- Tie the jars with tape and hang them from a branch. From the bottom, fix the stick with glue, it will be convenient for the birds to peck at the food.


You can cook a treat for the birds yourself by making a kind of kozinaka. You can cook a culinary miracle pretty quickly. Eating such a treat, the birds will peck the food slowly and carefully and will not be able to scatter it.
For cooking, take:
- 2 packs of gelatin;
- cocktail tubes;
- cookie cutters;
- any seeds (buckwheat, sunflower seeds, rolled oats, millet, dried fruits);
- thread or rope;
- hot water (2/3 cup).
Cooking process:
- Pour boiling water over the gelatin, add the food and mix the mixture well.
- We spread the resulting mass into molds and insert the tubes from above.
- When the mixture has cooled, take out the tube and take out the mass from the mold. Pull the rope into the hole from under the tube.
Birds can peck food even from a cone. Find a larger cone in the forest and coat it with peanut butter. Various grains will stick well to it.
Make an edible garland and place it on the tree. Slide the cornflakes over the wire and form into hearts. In turn, they need to be fastened together, and then hung on a branch.


DIY wooden feeder with drawings and dimensions
Wooden feeders are durable, environmentally friendly and functional. Birds can cling to the sides and settle down comfortably to peck food. The most suitable side height is 4 centimeters.
Thin plywood is suitable for the bottom and roof, and wooden blocks are suitable for the manufacture of vertical elements. The height of the feeder is considered optimal from 20 to 30 centimeters, and the length of the sides is from 25 to 40 centimeters. The roof should not be plastic, metal, so the birds that have flown in will not slide off it.
The feeder is hung on a rope and tied to a branch, and also attached to the trunk and to the fence. Please note that it should be convenient to replenish feed stocks.
To make a product, we need:
- roulette;
- plywood, boards, wooden blocks;
- sandpaper;
- pencil;
- hacksaw;
- drill, screwdriver or hammer;
- drills, screws or nails;
- glue;
- carpentry corner.
You can find various schemes of bird feeders on the Internet. In our example, we will use a blueprint.
Work process:
- We outline the markings with a pencil and cut out the details along the lines.
- We attach the bars to the bottom with self-tapping screws. They function as bumpers. On the short side, we fix the bars end-to-end with the edges. On the long side, we indent about 5 millimeters.
- We fasten the walls with self-tapping screws to the long sides with indents.
- We fix the walls by connecting them together with a bar, which we fasten with self-tapping screws from the inside.


We pass the rope through the top of the roof and hang the tree house.
Be sure to sand the wooden parts with sandpaper, the bird will not get hurt. A house assembled with self-tapping screws is stronger than a structure fastened with nails.
Below are the assembly diagrams with and without side walls.


Feeder with your own hands from a box for juice in kindergarten
Even a child can easily make a birdhouse from a box of juice and milk. You can bring such a craft to the kindergarten.
For her, we need to prepare:
- scissors (office knife);
- felt-tip pen;
- an empty box;
- electrical tape;
- awl;
- rope or wire.
First, we outline the markup and cut out a window in the wall of the box. We do the same on the opposite wall, the birds will be able to freely fly in and out after a meal. We bypass the holes with electrical tape for safety reasons. Then we bend the corners of the bag and make holes in them with scissors and an awl. We will put the rope in them.
To prevent the house from swaying from the wind, it can be fixed on a tree trunk. In this case, the windows are best done on the adjacent walls of the box. We make holes on the opposite wall, insert the wire and attach it to the trunk.

Two juice boxes also make an excellent feeder. Cut one box in half along the narrow side, leaving the top intact. We use only half or one third of the second package. It will serve as a bottom. We make a window on one of its sides. Feed will be poured there. We combine the boxes and we get a triangle shape. It can be glued or tapered. And also poke holes at the bottom and thread tubes through them.
You can build a huge number of options for bird feeders with your own hands.


Photos, original ideas for their manufacture, we have considered in this article. Using these easy instructions, you will be able to make any bird house with the kids. Wish you luck! Subscribe to the blog and share master classes with your friends on social networks.
Best regards, Natalia Krasnova.

Wild animals and birds that live in nature cannot count on the fact that in winter someone will help them in the same way as their domesticated "brothers". Nevertheless, many people understand this and try to provide all possible help during the winter cold season.
Benefit for both you and the birds
Caring people are well aware of how difficult this time is for our younger brothers, since starting in late autumn, many of them find it increasingly difficult to find food. Of course, with all the desire, it is not so easy to help those of them who live in the forest or in a remote area. However, if you live in a city, town or village, then everything is within your power. Today we will talk about bird feeders. It is quite possible to make them, and we are talking about the use of improvised means, old packaging and containers, as well as other materials, which in any case would most likely be thrown into a landfill.

By the way, having "accustomed" the birds in your feeder located on the site, in addition to the feeling that you are helping them, saving them from hunger in a difficult time of the year, you get a kind of additional "bonuses":
- Birds will become accustomed to your site and begin to inhabit it and near it more often. Thus, they will constantly delight you with their games, bustle and chirping, filling the surrounding space with vital energy.
- Quite often it happens that in the summer the birds return a kind of debt to you, destroying numerous insects and pests that live in almost every garden or vegetable garden.

Wood is a reliable material!
In today's article, we have presented a photo of many options that will help with ideas on how to make a do-it-yourself bird feeder. As a rule, in order to implement the project of such a feeder, you do not need complex projects and drawings.
Attention! You can feed the birds not only in winter, but also in summer, especially if you live in a country house or in a private house.
Before considering the basic ideas for making feeders, let's talk about some of the features of the choice of material, as well as about the places in which you can hang or attach such a homemade structure.
Choice of material and place for installation
Before choosing a place for a feeder, it will be very useful to learn the most common types of birds that live in our latitudes.

1. Nuthatch; 2. pika; 3. lesser spotted woodpecker; 4. crossbill; 5. jay; 6. nutcracker or walnut; 7. bullfinch; 8. waxwing; 9. ordinary grosbeak; 10. goldfinch; 11. siskin; 12. common oatmeal; 13. greenfinch; 14. great tit; 15. blue tit; 16. crested tit; 17. Muscovy Tit; 18. long-tailed tit; 19. tit-tit.
Traditionally, it is believed that a bird feeder should have the shape of a kind of house, which would be somewhat similar to a birdhouse. And in fact, this configuration is optimal in order to organize a place for feeding the birds there. Consider the benefits of this form:
- The roof provides protection from rain and snow.
- This construction, made of plywood or wood, is strong, durable and reliable.
- It will not look alien, since we are talking about landscape design and the visual appeal of the entire site.

Nevertheless, one should not be limited only to this form, and also to the fact that only wood can be used as a material. In fact, both the configuration and the material can be completely different.

The main thing is that the feeder meets the basic requirements:
- The material from which the feeder is made must be stable and not deform over time. In other words, a birdhouse made of cardboard or similar improvised means is not good. It simply will not withstand difficult weather conditions: rain, sleet, etc.
- At the same time, you can, as a last resort, make a small feeder out of juice or dairy products (kefir, milk, etc.) packaging. Tetra Pak and similar cardboard packaging are much more adapted to moisture exposure than ordinary cardboard. However, such designs cannot be classified as durable. On the other hand, they are quite suitable as a temporary solution, which, under favorable circumstances, can serve you for a whole season. At the same time, it is necessary to understand that a feeder from a milk bag will fit only for small birds, since large ones simply will not fit in it.
- By the way, the following conclusion follows from the previous point: the material must be durable and stable, since it must withstand not only autumn-winter bad weather, but also the weight of the birds themselves, some of which are quite massive. Besides, keep in mind that wear and tear will also occur due to the constant impact of their claws, since they will sit, as a rule, in the cut-out opening ("window").
- By the way, since we are talking about the window, the entrance (this technological hole can be called, in fact, whatever you like), then you need to understand that its edges should not be sharp, because, otherwise, the birds can hurt their paws about them.

Location
In addition to the material, as well as the manufacturing technology, you must understand that the place in which you install or hang the bird feeder is also an important point. So, if possible, it is necessary to avoid installation in those places where birds will have difficulties with access. We are talking about dense branches and other similar places.

In addition, pay attention to the fact that the feeder is located in a place that is inaccessible for cats, which, as you know, are excellent hunters, who live in large numbers in villages, in summer cottages, as well as in cottages and private buildings.
Advice! Locate the feeder in an open area where birds can easily see it.

Popular ideas
Let's look at the basic ideas of how best to make a bird feeder with your own hands, looking at "live" examples of how many people have implemented their projects. There can be many feeders, and there are countless options for their manufacture. However, they are all done for the same purpose. So, here are the main types of structures of this kind.

The dispenser is a very useful device for feeding birds. In addition, the bottle can be hung upside down
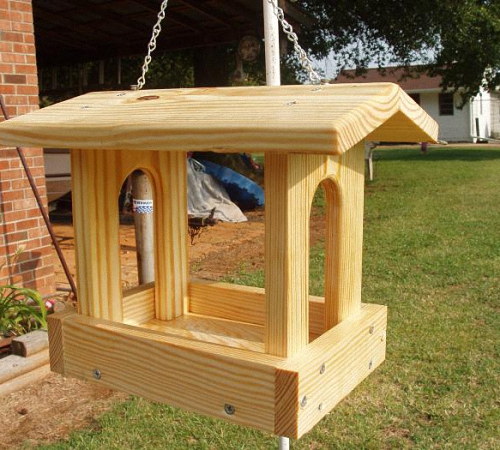
House made of wood
It is quite possible to make such a design on your own. There is no need to have any specific skills or knowledge. As a rule, during such work, improvised or unnecessary boards, pieces of logs and many other wooden elements are used. Taking planks or veneers as a basis, the main task is their strong connection.

By the way, wooden bird feeders can be used not only for feeding backyard birds. Similar designs are used in chicken coops, when feeding chickens and other poultry. However, this, as they say, is a completely different story.
Plywood feeder

Such a structure can be made by hand right at home. For this you do not need any special tools or conditions. In this case, of course, you will have to find drawings of the feeders. On the other hand, you can make a drawing with dimensions yourself, since there is nothing particularly difficult in its development. For additional ideas, we recommend that you familiarize yourself with the photos and examples of finished works.

Bunker feeder
This type of construction, so to speak, "migrated" from agriculture. One of its main advantages is that it allows you to exclude the "discrimination" of some species of birds by others. You yourself probably noticed that often a flock of some birds, for example, sparrows or tits, occupies an advantageous position in the immediate vicinity of the feed (seeds, bread crumbs, grain, cereals, loaves, etc.) or even in the feeder itself and tends prevent other birds from accessing such a valuable resource.

Therefore, it becomes an important task to limit the area on which feathered friends can feed. Therefore, in such cases, homemade bunker feeders, also known as anti-sparrow feeders, can come in handy.
Plastic bottle feeders

A canister feeder is also a great option.
This type of construction is extremely simple, so everyone, including children, can make it on their own. In order to make it, you only need to cut one or two holes in the bottle in order to pour bird food inside, and in fact, so that the birds have the opportunity to get inside. Of course, you need to be careful when doing this, since the holes should be as even and symmetrical as possible.

Interesting! If you have the time and desire, you can additionally decorate the feeder with natural materials, or apply inscriptions.
Let's take a closer look at the features of work in the presence of bottles of different sizes. The fact is that the most common starting materials in such cases are:

So, if you use the first option, then you can choose two types of structures. In the first case, it is about making holes in both sides of the bottle. They can be of different shapes: round, rectangular or square.

In the second case, you can make a special visor that would cover the hole, protecting it from snow. In order to make it, you just need to cut the U-shaped hole, leaving one side (top). After that, this section of the bottle is bent upward, thus forming a kind of visor. Incidentally, this can also be done on both sides.

For the birds' convenience, you can make two small holes under the main openings and insert a long stick into them that they can sit on before getting inside. As for the lower edge of the main holes, for greater safety it is advisable to glue it with tape or electrical tape in several layers. A tissue adhesive is also suitable. Thus, a do-it-yourself feeder is made from a plastic container of a relatively small volume.

It is even easier to make a feeder from a 5 liter bottle. The fact is that the walls are often straight, which allows you to cut a more even hole. Plus, more seeds and crushed loaves can be placed in such a container, and it is more convenient for birds to fly inside. For crafting, you will need a knife or sturdy scissors.

If the plastic bottle is mounted horizontally, the holes can be cut in place of the bottom and neck. If you plan to fix it vertically, then you can cut 2, 3 or even 4 holes from different sides, if you are working with a bottle that has a square or rectangular cross-section. This, by the way, will allow several birds to fly in and feed at the same time. For round bottles, you can cut 2-3 holes. By the way, on the basis of a large bottle with a volume of 5 liters and above, you can also make a bunker feeder.

On a note! It is advisable to cut the holes at a height of at least 5 centimeters from the bottom, maybe a little more.
Attaching such a feeder is quite simple: you can tie it either by the neck or by the handle, which is an integral part of the lid, using twine or thin wire. This is if we talk about vertical options. When fixing horizontally, it is best to make 2 parallel small holes (they can be made with a knife or other sharp object), passing a wire or rope through them, which is necessary for fastening.

In any case, this option is very affordable, since almost everyone has unnecessary 5-liter water bottles at their disposal. Sample photos show various options for how this can be done.
Bird feeder from a bag of milk or juice

5 minutes - and a new feeder from the juice bag is ready
Everyone has boxes of juice or milk. As a rule, we throw them away. The manufacturing technology is extremely simple, and in some way resembles the previous one (with plastic bottles). So, if you want to make a bird feeder from a bag of juice or milk, the sequence of your actions can be as follows:
- We outline future holes using a pen, marker or felt-tip pen.
- We carefully cut them out using scissors or a sharp knife.
- We glue the underside of the opening with tape or adhesive tape.
- Make small holes for the rope or wire at the top of the bag.
- We hang the resulting feeder to a tree branch, lilac or other places.

The easiest and fastest option from a milk carton
By the way, in some cases you can put on the bottom or attach a weight to it in the form of a brick fragment or something similar. This will minimize sway in the event of strong winds. This applies not only to paper boxes, but also to plastic bottles.
Remember! In some cases, you can also attach the feeder to the wall.
We use a shoe box

By the way, a bird feeder is made in a similar way out of a shoe box. Of course, the fact that it is made of cardboard does not allow such a feeder to be durable. On the other hand, some of the boxes are made of cardboard that is strong enough and resistant to moisture. Moreover, you can additionally glue the cardboard with tape, which will further increase its protection from the effects of bad weather conditions. This will increase the life of the feeder to some extent, although, in any case, it will not be as durable as its counterparts made of wood, cardboard and even plastic.

The manufacturing technology itself is extremely simple and does not require any special instructions. You just need to make the necessary slots on the sides of the box and also fix the lid. You can also do this with tape.
Other options

By far, all of these types of feeders are the most common and popular. Nevertheless, it makes sense to talk about alternative options. The first is a trough made from tableware.
By the way! A drinker can also be made of dishes, which is also very important for birds.

Such original products are made from cups and saucers. If you add a deep bowl, you can make both a feeder and a drinker at the same time. Some craftsmen make feeders from old buckets, usually plastic ones. They turn out to be large, which somewhat limits the possibilities for their installation, which, of course, is a certain drawback. The advantage is the same: the size of such a product is quite large. This allows more feed to be added. In addition, several birds can feed at the same time. We must not forget about the strength of such a structure.

Bird feeders in winter help save birds from hunger. However, this is not the only reason to start making them.
By themselves, beautiful and original feeders can become a unique decoration for your garden.

And the process of their creation instills in the younger generation a sense of responsibility and care for weak creatures.

In addition, this is an invaluable time, which allows parents to spend their time with their children with interest and usefully.


Bird feeders made of wood
There are several types of feeders that can be made from wood. Firstly, these are feeders, which look like a base made of plywood or other similar material with bumpers along the edges, which prevent treats for birds from scattering.

Most often, such a structure is suspended from a tree branch with thick ropes.

But such a feeder has several disadvantages. The most obvious is that such a structure does not protect the feed poured into it from precipitation and bad weather. It is also quite light and can move or turn over in the wind.

The second version of wood feeders is more like a house and has a roof. In such feeders, the feed is reliably protected from the weather. The base of the structure looks the same as in the first version, only on it there are supports that support the roof.

The roof can be either straight or pitched. Any child can make a straight roof, because in fact it is a rectangular piece of plywood, only slightly larger than the base.

The pitched roof has a slightly more complex structure, but it is better in that, unlike a straight roof, snow does not accumulate on it and does not have to be periodically cleaned.

There are also original versions of feeders made of wood. For example, a feeder can be made from regular logs. To do this, you need a chainsaw, chisel and hammer, as well as a chain and suspension rings.

To begin with, you need to saw off two rounds from the log on both sides of the future feeder. Then a wedge is cut along the entire log, and longitudinal and transverse cuts are made, not reaching the bark of about 5 centimeters.

This is necessary so that later it would be easier with a chisel to remove the middle from the workpiece. After all the work is done, the previously cut rounds are nailed on both sides of the trough.

All that remains is to screw in the rings and attach a chain on which you can hang the feeder.

Plastic bottle feeders
To feed the birds, plastic bottles are also used as feeders. These can be both 5-6 liter containers and small 1.5-2 liter bottles.

Most often, a plastic bottle is turned into a feeder by cutting out several windows in the body.

Then such feeders are hung horizontally or vertically, depending on the design. For the convenience of birds, cross perches are installed near the bottom of the feeder.

But sometimes you can find quite original feeders, in which automatic feed addition is provided. These are the so-called bunker feeders.

Such a feeder can be two wooden spoons inserted at an angle into the through holes in the bottle, Thus, the food from the bottle will gradually spill out onto the spoon.

A hopper feeder can be made from a 2 liter bottle. To do this, it is enough to cut the bottle in half, make round holes in the lower part, and turn the upper part over and put the neck down. The top can be covered with a lid or a disposable plate. It will not take a long time to add food to such a feeder.

Materials at hand for creating bird feeders
The simplest feeder that you can think of is a garland of rowan, pine cones or berries. A rope-strung feathered treat will brighten up the young trees in the garden. The only drawback of such a feeder is that as the food is eaten, the garland loses its appearance.

An interesting solution would be to make a feeder in the form of lumps with grain or seeds. Such decorations can be placed on benches, tables, or simply hung from trees in the nets in which tangerines are usually sold in the store.

They are based on fat or gelatin. The fat is melted and the main feed is added to it. Then the finished substance is poured into molds (these can be baking dishes or an ordinary balloon) and placed in a cold place to solidify.

Do the same with dissolved gelatin mixed with grain.

If you have a coconut shell lying around, then it can also be used to make a feeder.

As a result, such a structure will be invisible on the tree. Juice or milk boxes are also suitable for making feeders. Their very design will not differ much from simple feeders made from plastic bottles.

Photo of bird feeder ideas


